
(Photo by vintage_patrisha at flickr.com)
4. Learn how to control the texture of food
Taste and flavour normally get more attention when food is discussed, but the texture of food is equally important and our tongue is very sensitive, not only to taste and temperature, but also to the texture of food. The texture of food determines it’s mouthfeel and it is related to many physical properties of the food. Wikipedia lists the following aspects of mouthfeel (click to see the full description of each aspect) which can be useful when analyzing food:
Adhesiveness, Bounce/Springiness, Chewiness, Coarseness, Cohesiveness, Denseness, Dryness, Fracturability, Graininess, Gumminess, Hardness, Heaviness, Moisture absorption, Moisture release, Mouthcoating, Roughness, Slipperiness, Smoothness, Uniformity, Uniformity of chew, Uniformity of bite, Viscosity, Wetness
I will barely scratch the surface of how texture can be controlled by highlighting a couple of topics and point you to further resources. Hopefully it will spark your interest and give some new ideas for you to play with in the kitchen. Those interested in a comprehensive review of food texture are referred to the CRC handbooks on food texture (volume 1: semi-solid foods, volume 2: solid foods).
What determines the texture of food?
Put very simple, it’s the relative amounts of air, liquid and solids that determines the texture of food. This is complicated by the fact that liquids have different viscosities. Furthermore the air, liquid and solid ratio is not necessarily constant. A liquid can solidify or evaporate, solids can melt or dissolve, and air bubbles can escape during cooking or storage. An elegant but quite abstract way of describing the complicated mixtures of air, liquids and solids found in food, is to use the CDS formalism (CDS = complex disperse systems), introduced by Hervé This.
(Photo by Subspace at flickr.com)
How can texture be controlled and changed?
Texture can be controlled by temperature, pH, air/liquid/solid ratio, osmosis, hydrocolloids and emulsifiers – to mention a few. Here’s some examples:
- Heating induces a change in the structure of proteins referred to as coagulation or denaturation. Typical examples are the boiling of eggs and the cooking of meat. When proteins denature they contract and become firmer. There are several helpful tables relating the doneness of different meats to temperature.
- At around 70 °C (160 °F) collagen, the connective tissue in meat, turns into gelatin. As a result the meat becomes more tender, which is desireable in stews and other slow cooked meats.
- Heat causes air/gas to expand and water to evaporate to give a foamy/airy texture. For example, experiments have shown that it is mainly the evaporation of water that causes a soufflé to rise.
- Heat will cause certain hydrocolloids to solidify (for exaple methyl cellulose) whereas it will cause others to melt (such as gelatin).
- Brining meat can greatly improve it’s texture and juicyness. This is done by immersing the meat in a 3-6% salt solution from anyhere between a few hours to two days before cooking.
- Frozen water in the form of tiny ice crystals are important for the smooth texture of sorbets and ice cream. Ice cream that has been partly melted and frozen again will grow larger ice crystals that impart a coarser texture to the ice cream.
- Acidic solutions (low pH) can cause proteins to denature. This allows fish to be cooked without the use of any heat. An example is the use of lime juice in ceviche.
- Emulsifiers, thickeners and gelling agents have almost become synonymous with molecular gastronomy for many. They can greatly alter the texture of foods and typically only a very small amount is required. Where gelatin was the only gelling agent videly available to cooks in Europe and America only a decade ago, this has changed with the advent of many internet suppliers of speciality ingredients. I’ve collected some useful recipes and hints in “Texture – A hydrocolloid recipe collection”.
- Cooking under vacuum can create new and exciting textures. First of all it’s a way of removing excess water without having to raise the temperature all the way up to 100 °C. When the water is removed, this will create pockets of air in the food, and when the pressure is released, the liquid surrounding the food that is prepared will rush in and fill these pockets. There is a commercially available vacuum cooker, but a DIY version can be made from a pressure cooker and a vacuum pump.
(Photo by Trinity at flickr.com)
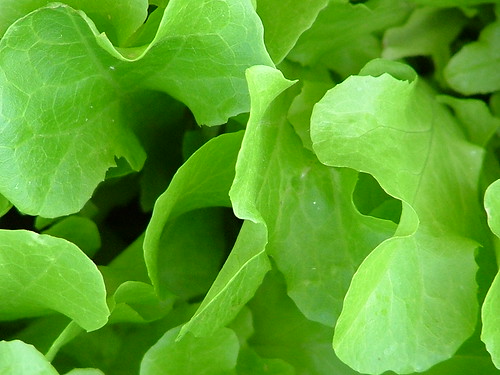
- Green leaf vegetables such as lettuce loose water upon storage. As the pressure inside the cells drops, the leaf becomes softer. By immersing the leaves in cold water for 15-30 min, thanks to osmosis, water will enter into the cells again. As the pressure increases, the leaves become crisper.
- Air bubbles can greatly modify textures, and foams really are ubiquitious (which becomes obvious if you read the book “Universal foam – from cappuccino to the cosmos”). Ferran Adria’s espumas have become very popular, as has his recent invention, the Espesso. Air bubbles are also very important for the texture of ice cream, in fact ice cream is nearly 50% air (just consider the fact that ice cream is sold by volume, not by weight!).
- A very recent addition to the modern kitchen pantry is the enzyme transglutaminase. The enzyme acts like a meat glue and Chadzilla has nice blog post on his transglutaminase experiments.
- There are also enzymatic counterparts of transglutaminase available: proteolytic enzymes also known as proteases. You can find them in pineapple (bromelain/bromelin), papaya (papain), figs (ficin) and kiwi (actinidin) – and they are capable of degrading proteins and muscle tissue. Despite this, they have only found limited use in marinades, as their action can be difficult to control (as Nicholas Kurti experienced, look for the “But the crackling is superb” link).
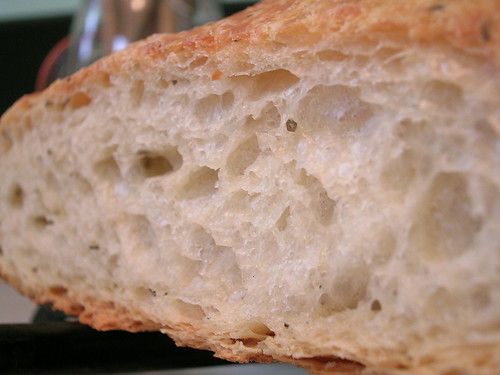
- When mixing flour and water, glutenin and gliadin react to form gluten which gives bread it’s elasticity and plasticity. Addition of 1-2% salt to bread tightens the gluten network and increases the volume of the finished loaf. Similarly, addition of 1% oil to the dough (after the first kneading) can further increase the volume. Larger amounts of fat added before kneading will interfere with the formation of long gluten strands, hence the name shortening.
- The no-knead bread that recently hoovered around in the blogosphere challenges the conventional wisdom that bread needs kneading to get a good texture.
- Once bread is baked, the staling process starts. Staling does not necessarily involve loss of water from the bread and is caused by crystallisation (or retrogradation) of starch. In this process water molecules are trapped. The process proceeds fastest at 14 °C, but is halted below -5 °C. This is the reason why bread should be stored at room temperature. The staling process can be slowed down by addition of an emulsifier such as lecithin which is abundant in egg yolk.
- A way of turning high fat foods and oils into powders is by the use of tapioca maltodextrin. Hungry in Hogtown has shown how Nutella can be turned into a powder.
*
Check out my previous blogpost for an overview of the tips for practical molecular gastronomy. The collection of books (favorite, molecular gastronomy, aroma/taste, reference/technique, food chemistry) and links (webresources, people/chefs/blogs, institutions, articles, audio/video) at khymos.org might also be of interest.
Martin,
most of us are probably aware of most of what you’ve written here. However, this compact and concise collection (with valuable examples) makes this a very useful abstract of a big area that seems quite difficult to handle. Well done.
Actually, this is invaluable for those among us who aren’t part of the “most” that Erik refers to. I’m completely new to the molecular gastronomy world and looking for anywhere I can learn about this kind of stuff, pick up ideas to play with, and get in on the fun. Reading through your site has been an eye opening experience to say the least!
A very cool blog entry, but the list-form makes it very hard to comment to individual entries:
-A very useful treatise on slow cooker can be found in wikipedia (http://en.wikipedia.org/wiki/Slow_cooker). The warning about beans and especially kidney beans and slow cooking cannot be overstated (http://vm.cfsan.fda.gov/~mow/chap43.html). There is a special mention of the more energy efficient way would be the “˜Vacuum Flask Cooking’, which seems to be all the rage in Asia.
-What is the mechanism of tenderizing meat by brining in salt water?
-Cooking under Vacuum: That Gastrovac seems like a very nice but at about EUR5000 also ridiculously expensive toy. There seem to be quite a few manufacturers for vacuum cookers for toffee/sweets preparation (No 4 (C1000Q3+C1000VLSG (http://www.datasweet.de/lab-mach/toffee-cooker.htm)) looks like a forefather of the Gastrovac) but even extensive googling resulted in no documented DIY projects?
-The “˜green leaf vegetable’-problem can be turned upside down: Wash the fresh salad as soon as you get it with cold water and store in a cold, though not freezing, place with plenty of water droplets still on the leaves, in a covered strainer. Works like magic with roquette.
P.S.: You mentioned the RotoVap (http://en.wikipedia.org/wiki/Rotary_evaporator), but omitted the entry. I’m still looking for a “˜battle hardend’ version (non glass, dishwasher/Hobart safe, and with an opening that is at least spatula friendly to get the stuff (i.e. your non liquids) in and back out again without hassle), capable of producing kitchen relevant amounts (i.e. liter to multi-liter). Any suggestions?
Mirko:
I’m not familiar with the slow cooker. Do the low, medium and high settings correspond to the same temperatures across different models? How constant is the temperature?
I haven’t found any documented DIY projects either, but I know about people who are in the process of making their own gastrovac. I’ll encourage them to post a description!
The vacuum cookers for toffee/sweets definitely look like predecessors of the gastrovac!
(The mention of the RotaVap was a copy-paste mistake… sorry! For a “battle hardend” version, I guess it depends whether the whole rotavap needs to be stainless steel or not. It would be fairly simple to attach a round bottomed stainless steel container with a wide opening to a normal Rotavap using an appropriate adapter.)
Hi Martin,
On the Slow Cooker: The temperature settings seem to be in the same region, though most of the cheaper models only offer low (75-80C) and high (85-90C) settings, with no temperature profile. In the models I inspected, a bi-metal strip directly driving the heater element did the temperature regulation. Some models used water as a moderator to an inner clay/ceramics pot with no water-level control. I tried to substitute (cooking) oil for the water to alleviate the perceived problem. It worked, especially for those ultra long cooking times (9h), but was a total mess to clean up afterwards.
On the DIY GastroVac: I entertained to idea of converting an Imperial (now Miele) steam cooker to vacuum cooking. The advantage being that they use GastroNorm size trays. The construction of their seals hindered further exploration: They are built to seal over-pressure, not under-pressure. The seals will collapse as soon as there is a vacuum in the cooking chamber. Very disappointing. Thus, I already bought a pressure cooker for further experiments.
On the RotaVap: Stainless steel would be nice, but a wide mouthed bottle of sizable capacity (easy to fill-up, easy to remove the “˜leftovers’ and easy to clean) would still let you watch the extraction process. Replacing the “˜glass cooler’ with a copper one should not be the primary problem.
I have been bringing in a slow roasting oven from switzerland called a Hold-O-Mat. which also cooks at exstremly lo-temperatures. holding with-in 1 degree. I have exclusive distribution in the USA. So far I’ve placed them with Daniel Boulud,David Bouley,Union hospitality(4 restaurants),Klee Brasserie, Swiss embassy, Doug Rodriguez and a few more the response has been great The inventor is a man named freddy hugentobler and he has some other very cool and progressive equipment mostly cutting edge sous vide. However none is U.L>,NSF approved So it is difficult to distribute in any quantity. I’ll fill you in on other items.Thanks.
Ken Cohen
can gelatin turned into glue?
Hi Martin,
Very first of all I’d like to congratulate for this blog. This is a great sample for everbody who want to write about molecular gastronomy.
A short remark only: you write above, that “Brining meat can greatly improve it’s texture and juicyness. This is done by immersing the meat in a 3-6% salt solution from anyhere between a few hours to two days before cooking.”
I know so, that below 4% the brine practically does not work or the procedure is too long to use in practice. The best concentration is between 5% and 6%. (Over 10% the salt already dry the meat.) We can read brining recipes are declared by famous chefs with 8,2% and other salt concentration, but from theoretical reason I’m always misgiving a so “precise” concentration and not able to decide how big part of this is the marketing and how big the science.
Sandor Csíki
According to McGee’s “On food and cooking” (p. 155-156), a 3% NaCl solution will begin to dissolve part of the proteins that support the contracting filaments, and a 5.5% solution will dissolve the contracting filaments themselves.
A further effect of brining is an increased water holding capacity. What is important here is that this increase is very pH dependant. Below pH 4 there is no increase in the water holding capacity upon addition of salt, whereas even at pH 5 a significant increase in the water holding capacity of the meat is observed (there’s a nice graph of this in this book, Fig. 12.26, p. 593). Therefore – when making a marinade it’s not so smart to use both salt and acid! Choose either one (or know that the addition of acid will reduce the effect of the salt). However, if you omit the salt from the marinade, the water holding capacity is at a minimum at pH 5. Lowering the pH to 3-4 increases the water holding capacity by more than 100%!
I am intrested in purchasing a Hold-O-Mat. Does any one have Ken Cohen contack info.
[…] – only to discover that more eggs were needed anyway). The reason for this is that the olive oil interferes with the formation of gluten because it covers the proteins glutenin and gliadin and prevents them […]
I am interested in learning more about the DIY version pressure cooker and a vacuum pump. do you happen to have further information on this topic?
Thanks in advance,
Rodolfo
Rodolfo,
Some people have inquired about this, but AFAIK no has made one yet. My idea with this was that a pressure cooker already has a tight seal. Attaching a vacuum pump to it should make it into a very simple DIY Gastrovac. But before you start a project like this – make sure you’re really interested in the effects you can obtain. IMO you’ll probably find sous-vide cooking much more rewarding.