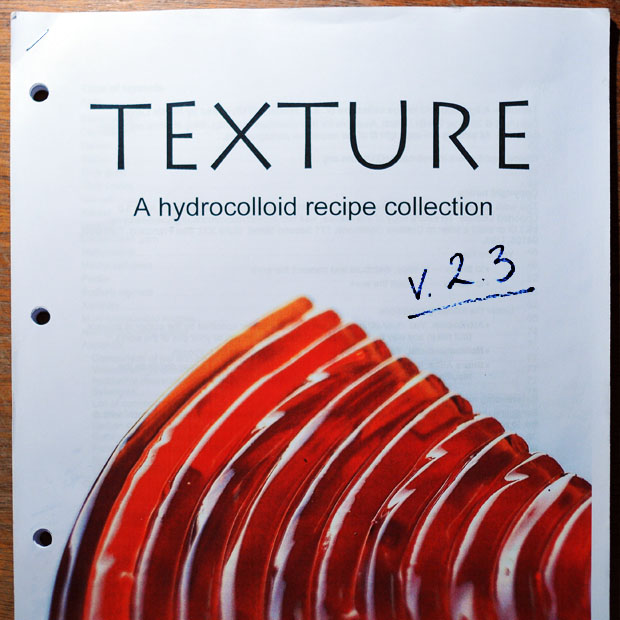
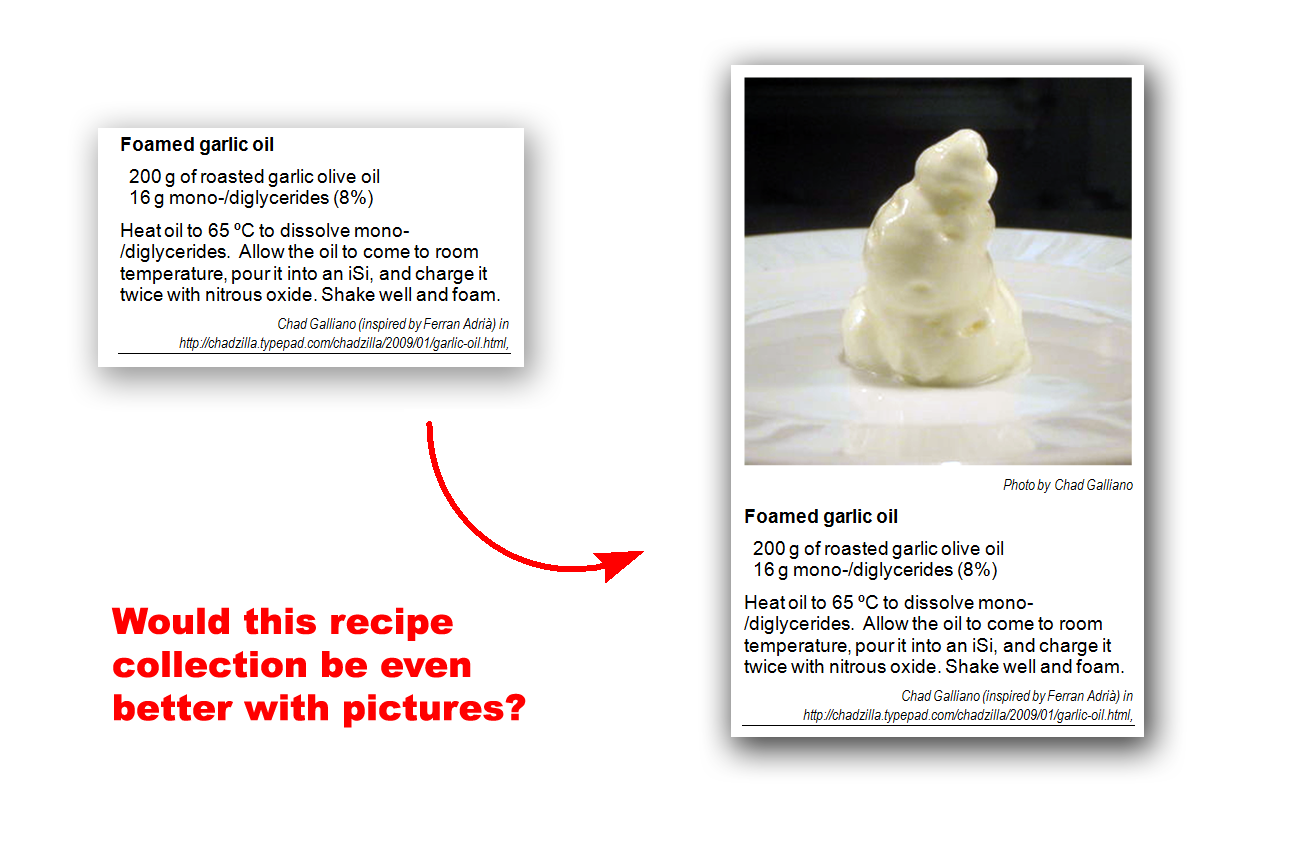
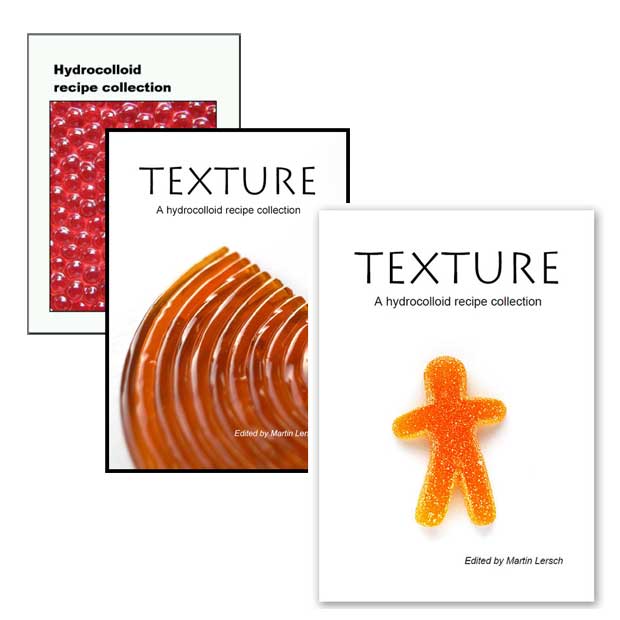
Archive for the ‘hydrocolloids’ Category

Hydrocolloid recipe collection v.2.1

Wednesday, June 25th, 2008

An updated version of “Texture - A hydrocolloid recipe collection” is now available for download (version 2.1). The version includes corrections of typos, minor additions to the property tables plus an important update in the gelatin section and a recipe for agar filtration. Read on for details!

I’m grateful for feedback from several readers pointing out that the size of gelatin sheets is made to compensate for different bloom strengths. In other words, one gelatin sheet will gel a given amount of water, regardless of the size of the gelatin sheet. To the best of my knowledge, this convention seems to have been adopted by most gelatin producers.

All gelatin based recipes have been updated to reflect this and most of them now give the amount of gelatin both in grams (for a platinum type, 240 bloom gelatin) and in number of sheets. I’ve also included a formula for conversion between different bloom strengths. This formula differs from what has been published earlier (no square root), but by testing the formula for given gelatin sheet bloom strengths and weights I got better results by simply multiplying the mass by the ratio of the bloom strengths. If you know more about these formulas, please leave a comment or email me.

Checking the gelatin recipes I discovered that the recipe “Strawberry spheres” originally called for “Sosa vegetable gelatin” which is not gelatin but a mixture of carrageenan and locust bean gum which are dispersed with maltodextrin. Since the exact amount of carrageenan and locust bean gum are not known I’ve deleted the recipe (but I’m sure you could achieve the same coating effect with plain gelatin, perhaps a 3-4% solution to render it viscous so it will cling the the spheres).

Thanks to feedback from a reader there is also recipe now for agar filtration (based on a Spanish forum post). This works just like gelatin filtration, but is much faster. Apparently you get more or less the same results with regard to clarity, flavor and color.

If printing the collection, make sure the hydrocolloid properties table is rotated so it prints correctly. This table is presented in landscape format. The right most column of the first page is gelatin - if you don’t see it, try printing these pages again. The pages are optimized for printing on A4. If printing on Letter sized paper, make sure you check the “resize” or “fit to paper” option in your pdf reader.

Thank you for comments, corrections, recipes and other feedback! As always, I can be reached at webmaster a t khymos d o t org.

Hydrocolloid recipe collection v.2

Wednesday, May 21st, 2008

Texture - A hydrocolloid recipe collection
It’s a pleasure for me to announce that an updated version of the hydrocolloid recipe collection is available for free download as a pdf file (73 pages, 1.8 Mb).

What’s new?
Several new recipes have been added (now counting more than 220 in total), including recipes with cornstarch, guar gum, gum arabic, konjac and locust bean gum. All in all 14 different hydrocolloids are included (plus lecithin which technically isn’t a hydrocolloid). In each section recipes are now sorted according to the amount of hydrocolloid used. The appendix has been updated with tables for comparison of hydrocolloid properties, hydrocolloid densities and synergies. The perhaps biggest change is that all recipes have been indexed according both to the texture/appearance of the resulting dish and according to the hydrocolloid used. Let’s say you want to make spheres, this index will show you which hydrocolloids can be used (that’s right - there are other possiblities than sodium alginate) and list the example recipes.

Foreword
A hydrocolloid can simply be defined as a substance that forms a gel in contact with water. Such substances include both polysaccharides and proteins which are capable of one or more of the following: thickening and gelling aqueous solutions, stabilizing foams, emulsions and dispersions and preventing crystallization of saturated water or sugar solutions.

In the recent years there has been a tremendous interest in molecular gastronomy. Part of this interest has been directed towards the “new” hydrocolloids. The term “new” includes hydrocolloids such as gellan and xanthan which are a result of relatively recent research, but also hydrocolloids such as agar which has been unknown in western cooking, but used in Asia for decades. One fortunate consequence of the increased interest in molecular gastronomy and hydrocolloids is that hydrocolloids that were previously only available to the food industry have become available in small quantities at a reasonable price. A less fortunate consequence however is that many have come to regard molecular gastronomy as synonymous with the use of hydrocolloids to prepare foams and spheres. I should therefore emphasize that molecular gastronomy is not limited to the use of hydrocolloids and that it is not the intention of this collection of recipes to define molecular gastronomy.

Along with the increased interest in hydrocolloids for texture modification there is a growing scepticism to using “chemicals” in the kitchen. Many have come to view hydrocolloids as unnatural and even unhealthy ingredients. It should therefore be stressed that the hydrocolloids described in this collection are all of biological origin. All have been purified, some have been processed, but nevertheless the raw material used is of either marine, plant, animal or microbial origin. Furthermore hydrocolloids can contribute significantly to the public health as they allow the reduction of fat and/or sugar content without loosing the desired mouth feel. The hydrocolloids themselves have a low calorific value and are generally used at very low concentrations.

One major challenge (at least for an amateur cook) is to find recipes and directions to utilize the “new” hydrocolloids. When purchasing hydrocolloids, typically only a few recipes are included. Personally I like to browse several recipes to get an idea of the different possibilities when cooking. Therefore I have collected a number of recipes which utilize hydrocolloids ranging from agar to xanthan. In addition to these some recipes with lecithin (not technically a hydrocolloid) have been included. Recipes for foams that do not call for addition of hydrocolloids have also been included for completeness. Some cornstarch recipes have been included to illustrate it’s properties at different consentrations. Recipes where flour is the only hydrocolloid do not fall within the scope of this collection as these are sufficiently covered by other cook books.

All recipes have been changed to SI units which are the ones preferred by the scientific community (and hopefully soon by the cooks as well). In doing so there is always uncertainty related to the conversion of volume to weight, especially powders. As far as possible, brand names have been replaced by generic names. Almost all recipes have been edited and some have been shortened significantly. To allow easy comparison of recipes the amount of hydrocolloid used is also shown as mass percentages and the recipes are ranked in an ascending order. In some recipes, obvious mistakes have been corrected. But unfortunately, the recipes have not been tested, so there is no guarantee that they actually work as intended and that the directions are complete, accurate and correct. It appears as if some of the recipes are not optimized with regard to proper dispersion and hydration of the hydrocolloids which again will influence the amount of hydrocolloid used. It is therefore advisable to always consult other similar recipes or the table with the hydrocolloid properties. The recipes have been collected from various printed and electronic sources and every attempt has been made to give the source of the recipes.

Since recipes can neither be patented nor copyrighted, every reader should feel free to download, print, use, modify, and further develop the recipes contained in this compilation. The latest version will be available for download from the static Khymos site and will also be announced here. I would like to thank readers for giving me feedback and suggestions on how to improve the collection. Feedback, comments, corrections and new recipes are always welcome at webmaster (a t) khymos ( dot ) org.

Help needed with densities of hydrocolloids

Wednesday, April 30th, 2008


Photo by Mel B via flickr.com (CC).

Measuring powders by volume has serious limitations (more on this later in an up-coming post), but one great advantage is that for small quantities going by volume can sometimes be more accurate than weighing them. At least when you work in a kitchen and don’t have access to professional lab scales. When a scale shows 0.1 g, the true weight could be anywere from 0.05-0.149 g due to rounding (that’s ± 50%!). Not to mention the fact that cheap balances aren’t always very accurate for such small amounts, even though they feature a 0.1 g resolution.

I’m currently working on a major revision of the collection of hydrocolloid recipes. One thing I would like to include is a table with densities of the hydrocolloids and chemicals used. When the densities are known, it’s possible to give some rough advice for what volume to use (this on-line conversion calculator has the densities of many common ingredients). This could ease small scale preparations. It will also make it easier to calculate the percentage of hydrocolloid used in recipes where the amount is given by volume. I’ve measured the hydrocolloids I have at hand, but I need your help to fill out the table and repeat the measurements I’ve done. With enough measurements I could also do some statistics and make a plot. I’m also interested to see if there is much variation between different brands.

How to determine the density:

  1. Find a suitable measuring spoon, cup, shot glass, container - whatever you have - with a volume of at least 10 mL (I used one of about 30 mL).
  2. Put the empty container on the balance and use the tara function.
  3. Fill completely with water and weigh again. The difference gives you the exact volume (for water 1 g = 1 mL).
  4. Dry the container, put it on the balance and use the tara function.
  5. Spoon the hydrocolloid into the container, tap the side gently once or twice with the spoon and level off.
  6. Weigh the container again and write down the mass of the hydrocolloid.
  7. To calculate the density of the hydrocolloid, divide the mass by the volume you obtained for your container. This gives you the density of the hydrocolloid with units g/mL.

Repeat steps 4-7 for each hydrocolloid you have at hand. I would very much appreciate if you email your results directly to me at webmaster (@) khymos (.) org. Please include the volume you measured (larger volume means more accurate measurement) and which brand you used. It will be interesting to see if the brands differ a lot.

I should add one coment about the products from texturePro: this picture indicates that all (?!!) the texturePro hydrocolloids are mixed with maltodextrin (please correct me if I’m wrong - it could be that this only applies to the cocktailPro kit). And I think the same is the case for several of the Sosa products. This increases the volume and eases the use of a measuring spoon (which comes with every texturePro kit), but unless the exact proportion of hydrocolloid to maltodextrin is known, following other recipes than the onces included with the kit is more or less impossible. Let me know if you have further details on the hydrocolloid/maltodextrin ratio in texturePro or Sosa products.

In advance: Thank you very much for your help!

Khymos marketplace

Saturday, March 29th, 2008

khymos-marketplace.png

I just wanted to let you know that the Khymos marketplace is operative. You can now shop books, hydrocolloids, thermometers, scales, whippers, syringes, tubes, squeeze bottles, knives and more directly from this site. I’ve selected products that should be of particular interest for amateur cooks and professional chefs that are intersted in molecular gastronomy, molecular cooking and popular food science. The marketplace is powered by Amazon.com.

TGRWT #7: Cocoa frico with cauliflower cream

Sunday, October 28th, 2007

cauliflower-cocoa-8.jpg

For this month’s TGRWT I wanted to make a cauliflower cream and serve it with something crispy. Considering the fact that cocoa and parmesan are also a good match I googled for parmesan crisps and found a nice recipe for “frico” - Italian parmesan crisps. The cauliflower cream was invented in the process of making it.

Cocoa frico
40 g parmesan, grated
2 t cocoa

Mix parmesan and cocoa. Divide into six portions on a parchment paper (use cake rings with a diameter of approx 9 cm). Bake for 4 min at 175 °C. Leave to cool. If made to thick, the fricos will be chewy rather than crispy.

cauliflower-cocoa-3.jpg
Grate parmesan and mix with cocoa.

cauliflower-cocoa-4.jpg
Transfer to parchment paper.

cauliflower-cocoa-5.jpg
After baking the fricos look like this - let them cool for a couple of minutes before handle them.

cauliflower-cocoa-6.jpg
If you want to make “baskets”, invert them over a wine cork or something similar.

Cauliflower cream
1/2 cauliflower, in slices
2.5 dL water
1.5 dL sour cream
2 t salt
1 t xanthan

Cut cauliflower in pieces and spread on aluminum foil. Bake for 40 min at 175 °C. Add water to cauliflower and pureé with immersion blender until smooth. Add sour cream, salt and xanthan and blend. Pass through a fine sieve and transfer to a 1/2 L whipper and charge with nitrous oxide. Note: To use up this portion of cauliflower cream makes you’ll have to make 20-30 cocoa fricos!

cauliflower-cocoa-2.jpg
Caramelized cauliflower with nicely browned edges.

To serve, place frico on plate, fill with cauliflower cream and sprinkle with pepper.
cauliflower-cocoa-7.jpg
The baskets were a little to large to grab, and impractical to eat with a knife and a fork. The flat half-moon pictured at the top of this post was easier to eat just using the fingers.

Verdict: A nice appetizer! Fricos have a strong parmesan flavour with a hint of cocoa. Aromas blend well, but the dish could need some kind of freshness added to it - Any suggestions?

Edible cocktails with gelatin

Tuesday, October 16th, 2007

edible-cocktails.jpg
Recipes for Bluberry martini jelly shots (top right), B-52 jelly shots (bottom right), Prosecco gelée (middle left) and Gin and Tonic gelée (middle) are given below.

Just wanted to point you to a beautiful picture gallery of edible cocktails accompanying an article by Betty Hallock at LA Times, “Cocktails you can eat”.

The recipes (shortened and converted to metric units by me) are as follows:

Blueberry martini jelly shots
300 mL vodka (blueberry flavored)
60 mL simple syrup
25 g gelatin (6.9%)
35 fresh blueberries

Mix vodka and syrup in small saucepan. Add gelatin and leave for 5-10 min until soft. Gently heat saucepan and stir until gelatin dissolves (approx. 10 min). Strain to remove any undissolved gelatin. Place bluberry in cocktail mold and pour vodka mixture into each mold. Cool until set. Makes about 35 cocktails of 15 mL each. (Adapted from Bar Nineteen 12)

Prosecco gelée
1 length of a vanilla bean
140 g sugar
15 g gelatin sheets, bloomed (3.1%)
340 mL Prosecco (or other white wine)

Scrape seeds from vanilla bean and mix thoroughly with sugar. Mix water and sugar in saucepan and heat over high heat until syrup almost comes to a boil. Remove from heat and bloomed gelatin and stir until it dissolves. Add wine and stir gently. Pour into 20 x 20 cm pan lined with plastic wrap and cool until set. Cut into squares, turn upside down to display settled vanilla beans and serve. (Adapted from Craft pastry chef Catherine Schimenti)

B-52 jelly shots
170 mL Kahlúa
170 mL Baileys
170 mL Grand Marnier
24 g gelatin sheets (4.7%)

Place each liqueur in separate bowls and add 8 g gelatin to each. Cover and leave until gelatin has softened. Pour Kahlúa/gelatin into a saucepan and heat over low heat until gelatin dissolves. Strain to remove any remaining solids. Pour liquid into a 10 x 20 cm pan lined with plastic wrap. Cool for about one hour. Repeat with Baileys, and then with Grand Marnier, pouring the newly prepared liqueur on top of the set liqueur in the mold. Cut into pieces and serve. (Adapted from Bar Nineteen 12)

Gin and tonic gelée
170 mL gin
10 g gelatin (2.2%)
280 mL tonic water
finely grated zest of 4 to 5 limes
1 T citric acid
1 1/2 t baking soda
1 T powdered sugar

Let the gelatin soften in gin for 5-10 min. Heat over low heat and stir until gelatin has dissolved. Pour in tonic water carefully (to avoid it from bubbling over), swirl the contents to obtain a homogeneous mixture and immediatly pour contents into 40 mL molds. Cool. To serve, unmold the gelée and sprinkle each cocktail with lime zest and a little of the premixed citric acid, baking soda and powdered sugar. Serve immediately. (Adapted from Providence pastry chef Adrian Vasquez) For reference, you might want to compare this recipe with Eben Freeman’s Jellied G&T.

You might notice that the amount of gelatin varies over a pretty large range from 2.2-6.9%. This is also well above the typical concentration found in jellies (0.6-1%). A possible reason for the large range would be that alcohol interferes with the setting of gelatin, and a quick plot of gelatin vs. alcohol content suggests that this might be the case.

gelatin-alcohol-plot.png

But as you can see from the B-52 jelly shots, the same concentration of gelatin is used for Baileys (17% alcohol), Kahlúa (26.5% alcohol) and Grand Marnier (40% alcohol), so there should be some room for variation here (I doubt that the resulting variation in texture was actually intended in this recipe). So if we round off, the linear regression yields the following correlation between gelatin and alcohol:

% gelatin to add = (% alcohol in final mix x 0.1) + 2

One thing that surprises me is that none of the recipes call for gellan? This hydrocolloid is said to have superior flavor release properties as it is more prone to break once you chew it. From what I know, it should work fine with alcoholic beverages. Has anyone tried this yet?

Kitchen gadgets

Thursday, October 11th, 2007

Popular science magazine has an amusing article on “The future of food” which portrays Dave Arnold, apparently the “man behind the curtain of today’s hottest movement in cooking”. I don’t buy all of this, but he’s no doubt had a central role in bringing lab equipment into the kitchens of North American chefs and teaching them a little science. You might also want to check out their gallery of kitchen gadgets. Some of my favorites include (click the pictures to lanuch the picture gallery at PopSci magazine):

kitchengadget_whipper.jpg
For the Pros: The Whipper. Adds a touch of air to every bite.

Within reach of the dedicated amateur chef, indispensible for the professional chef: a whipper which you can charge with either carbon dioxide (for instance to make carbonated fruit) or dinitrogen oxide (too make foams/espumas or simply whipped cream).

kitchengadget_circulator.jpg
For the Pros: The Sealer and Circulator. Cooks in a bag to lock in juiciness.

Sous vide cooking is perhaps one of the most fascinating examples of science inspired cooking. The picture shows a vacuum sealer and a thermostated water bath circulator. If this is too expensive, check out my post on a simple and easy DIY sous vide.

kitchengadget_chemicals.jpg
For the Pros: The New Spice Rack. Chemicals the experimental home chef shouldn’t be without.

Last but not least: the different chemicals which become more and more available. I’ve put together a collection of hydrocolloid recipes which will help you get started using these fascinating chemicals. If you have troubles getting hold of these, my list of suppliers might help you.

Of course I’d like to put my hands on a Pacojet, an Antigriddle or a Gastrovac as well, but for a home kitchen, this gets too exotic and far too expensive. But - the most surprising gadget was the vacuum meat tumbler from Reveo. Just like the extremely expensive Gastrovac, this little machine can be used for vacuum impregnation of meat and other foods (or at least this is something I assume from the description). IMHO vacuum impregnation is the most important feature of the Gastrovac - far more important than the heating capabilities. Perhaps someone owning a Reveo could report back?

kitchengadget_vacuummeattumbler.jpg
For the Home: Meat, Your Maker. This vacuum tumbler cuts marinating time by hours, first extracting air to expand the meat’s fibers and then spinning it so that every area is exposed to your sauce of choice. Probably doesn’t beat a good long soak, but perfect for when barbecue inspiration suddenly strikes.—Abby Seiff

But I was very dissapointed that my all-time favorite kitchen gadget didn’t make it into the gallery: a simple thermometer. As I have stated in one of my tips for practical molecular gastronomy, this is probably the single tool that can improve your cooking the most.

TGRWT #5: Grilled pork tenderloin with chocholate beef stock cream

Sunday, August 26th, 2007

chocolate-beef-stock-cream.jpg

This month’s TGRWT is hosted by Le Petite Boulanger, and the foods to pair are chocolate and meat. The recipe for the chocolate beef stock cream is inspired by the Iberian Ham Cream by Ferran Adrià/El Bulli (the recipe can be found on p. 21 in the hydrocolloid recipe collection). I used anis because it brings out the meatiness very well. After mixing in the olive oil I saw that the droplets were not properly dispersed. Addition of some lecithin which solved this problem.

Chocolate beef stock cream
100 g water
2 g beef stock powder
10 g chocolate (70%)
1/4 t anis, powdered
0.5 g xanthan
0.2 g lecithin
20 g olive oil
honey and chili oil to taste

Heat water to dilute beef stock and melt chocolate. Cool. Add xanthan and lecithin. Mix with immersion blender. Add olive oil. Mix until smooth texture. Sprinkle with chives.

Grilled pork tenderloin
pork tenderloin, cut in 3 cm thick pieces
oil
powdered anis
crushed garlic

Marinate meat with oil, garlic and anis mixture. Grill. Serve together with the chocolate meat broth cream.

pork-chocolate-beef-stock-cream.jpg

Verdict: The chocolate beef stock cream has very meaty and almost nutty flavour. Honey is important to round of the otherwise slightly bitter taste of the chocolate. Chili oil gives it a bite, but can be omitted.

You can get an impression of the texture from this video:

Hydrocolloid recipe collection

Tuesday, August 14th, 2007

I’m happy to finally announce the first edition of a recipe collection devoted mainly to hydrocolloids. Totaling 111 recipes, it’s available for download as a pdf file (29 pages, 433 kB).

Update: The collection has been revised and is now available for download (more than 220 recipe, 73 pages, 1.8 Mb).

The following text is from the introduction I’ve written to the recipe collection:

A hydrocolloid can simply be defined as a substance that forms a gel in contact with water. Such substances include both polysaccharides and proteins which are capable of one or more of the following: thickening and gelling aqueous solutions, stabilizing foams, emulsions and dispersions and preventing crystallization of saturated water or sugar solutions.

In the recent years there has been a tremendous interest in molecular gastronomy. Part of this interest has been directed towards the “new” hydrocolloids. The term “new” includes hydrocolloids such as xanthan which is a result of relatively recent research, but also hydrocolloids such as agar which has been unknown in western cooking, but used in Asia for decades. One fortunate consequence of the increased interest in molecular gastronomy and hydrocolloids is that hydrocolloids that were previously only available to the food industry have become available in small quantities at a reasonable price. A less fortunate consequence however is that many have come to regard molecular gastronomy as synonymous with the use of hydrocolloids to prepare foams and spheres. I should therefore emphasize that molecular gastronomy is not limited to the use of hydrocolloids and that it is not the intention of this collection of recipes to define molecular gastronomy.

One major challenge (at least for an amateur cook) is to find recipes and directions to utilize the “new” hydrocolloids. When purchasing hydrocolloids, typically only a few recipes are included. Personally I like to browse several recipes to get an idea of the different possibilities when cooking. Therefore I have collected more than 100 recipes which utilize hydrocolloids ranging from agar to xanthan. In addition to these some recipes with lecithin (not technically a hydrocolloid) have been included. Recipes for espumas that do not call for addition of gelatin or other thickening agents have also been included for completeness.
All recipes have been changed to SI units which are the ones preferred by the scientific community (and hopefully soon by the cooks as well). As far as possible, brand names have been replaced by generic names. Most of the recipes have been edited and some have been shortened significantly. In some recipes, obvious mistakes have been corrected. But unfortunately, the recipes have not been tested, so there is no guarantee that they actually work as intended and that the directions are complete, accurate and correct. The recipes have been collected from various printed and electronic sources and every attempt has been made to give the source of the recipes.

Since recipes can neither be patented nor copyrighted, every reader should feel free to download, print, use, modify, distribute and further develop the recipes contained in this compilation. The latest version will be available for download from http://khymos.org/recipe-collection.php and will also be announced at http://blog.khymos.org. Feedback, comments, corrections and new recipes are welcome at recipe.at.khymos.dot.org.

Martin Lersch
Oslo, August 2007

TGRWT #3: Foamy strawberries with coriander

Sunday, June 17th, 2007

strawberry-coriander-icecream.jpg

Previously I had only tasted sliced strawberries with a fresh coriander leaf, just as a very basic illustration of this pairing. I must say I liked the combination, even though it’s dominated by coriander (or cilantro as it’s called in North America). But I figured that once the strawberries are processed into a dish, one would probably have to reduced the amount of coriander, so I did quite a lot of tasting as I proceeded with this combination for the third round of “They go really well together” (previous rounds: TGRWT #1, TGRWT #2). And I was surprised how well the coriander came through, even when using as little as 0.5 g! So start with a small amount of coriander if you decide to try this. Several have commented that they’re not to fond of coriander or the strawberry/coriander combo, and I wonder if this could be because they used too much coriander?

Anyway, I decided to go for a warm strawberry foam and be carefull with the amount of coriander. I started out without sugar, but found that sugar was essential for the strawberry coriander pairing (unless I would have taken it all in a savory direction like M did). Balsamico vinegar emphasizes the strawberry aroma and adds acid which I find important. If you plan to prepare this dish, I would suggest to add coriander, sugar and vinegar a little at a time, just to make sure it fits your taste.

Foamy strawberries with coriander and balsamic vinegar
200 g strawberries
0.5 g fresh coriander leaves
30 g sugar
14 g balsamic vinegar
150 g water
1 g xanthan

Make a purée of strawberries, coriander, sugar and balsamic vinegar with an immersion blender. In a separate container, mix water and xanthan using the same blender and add to the strawberry mix. Xanthan gives a viscous solution and helps retain the bubbles. The nice thing with xanthan is that it dissolves in cold liquid and requires no heating, but is stable at higher temperatures if you should want to heat the mixture. The immersion blender can be used to whip in some air, but for an even more airy texture, use an ISI whipper (many models available: cream, easy, gourmet, dessert, thermo) and charge with a cream charge (N2O). Important: you must filter out ALL the small stones from the strawberries using a cheese cloth or a towel, before transfering the mixture to the whipper, as these will clog the nozzle of the wipper (mine got clogged!). For a warm foam, heat the whipper in a water bath at 60-70 °C, but only do this if you have the ISI gourmet or thermo whippers which are designed for higher temperatures.

strawberry-coriander.jpg

Verdict: I was very satisfied and my wife liked it too! There’s a good balance between the strawberry and coriander aroma. Sugar rounds of the taste and the balsamic vinegar balances the sugar with it’s tangyness. I served the foam warm together with plain vanilla ice cream - delicious! At room temperature the sugar/acid balance was perfect according to my taste, but when served warm the foam was perhaps a little on the sweet side (which comes as no surprise as sweetness decreases when lowering the temperature).

strawberry-coriander-foam-closeup.jpg
Closeup of a larger air bubble below the surface! Who can resist to taste this?

Banana marshmallows with parsley (TGRWT #2)

Sunday, May 20th, 2007

banana-parsley-marshmallow-4.jpg

A while back I saw Evelin’s post on how to make marshmallows for Valentine’s day, and I knew immediately that I would like to give it a try. With TGRWT #2 coming up (that’s the second round of the food blogging event “they go really well together”), I thought I’d make marshmallows with a banana parsley twist. I figured that the banana flavour should fit very well with the soft and airy, yet elastic texture of marshmallows. And I was very curious to find out how the parsley would fit in!

Marshmallows were originally made using egg whites and the sap of the root of the marshmallow plant which were cooked with sugar and whipped into a foam. Today the marshmallow sap and egg white have been replaced by gelatin which is a protein produced from collagen in the connective tissue of animals. Proteins are good at stabilising foams (see previous post on how to make a Vauqelin). Addition of sugar increases the viscosity which stabilizes the foam even more. In marshmallows this is taken to an extreme. A large amount of gelatin is added to a concentrated solution of sugar (and corn syrup). This mixture is whipped for about 10 minutes to incorporate air and to break up larger air bubbles into smaller ones.

The first challenge was to find a suitable recipe. There are recipes that call for sugar only whereas others call for sugar and corn syrup (this recipe also gives a hint on how to substitute fruit purree for water). Corn syrup is added to prevent crystallization. Also some recipes use egg whites which are said to give a lighter texture. I decided to go for a simple recipe and used only sugar. I would also need to substitute mashed bananas for some of the water. Addition of parsley shouldn’t need any special adjustments of the recipe. I ended up with a recipe which is more or less a mixture of all these.

If you’re unsure about the process of how to make marshmallows, Cooking for Engineers has a detailed step-by-step description with pictures. The pictures at the end of this post should also give you an idea of what the texture is like. If you’re still lost, check out this video (the first in a series of six) on how to make mango marshmallows.

Banana marshmallows with parsley
65 g water
200 g sugar
10 g gelatin, bloomed in plenty of water
65 g banana, mashed
parsley (see comment below on why it shouldn’t be finely chopped)

Bring water and sugar to boil while stirring. Remove from heat when temperature reaches 110-115 °C (230-240 F). Add bloomed gelatin sheets and mashed bananas. Whip for 10 minutes (much longer than you think!). Add parsley to taste. Grease a pan, sprinkle with powdered sugar and spread mixture in pan. When set, invert pan on a surface dusted with plenty of powdered sugar and starch. Cut up in desired pieces and coat every cut surface with powdered sugar and starch.

What about the taste? I tasted the mixture before it set and was surprised by how well the banana and parsley blended together. To be honest, it tasted really nice! The next day however, after I had cut the marshmallows into squares, they tasted quite different. The parsley aroma had changed significantly and was more reminiscent of hay, so I was quite disappointed. The banana flavour was still intact, but I felt it was somewhat weaker than in the fresh mixture. Nevertheless, some guests I served it to reached out for both a second and a third piece of my banana marshmallows with parsley, so they couldn’t have been that bad after all. Perhaps it had to do with the texture which was really, really nice!

It turns out that the hay like off flavour of parsley is well known and described in the litterature! See for instance “Hay-like off-flavour of dry parsley” or “Evaluation of the effect of drying on aroma of parsley by free choice profiling”. The molecule responsible for the hay-like off flavour is 3-methyl-2,4-nonanedione. And apparently vacuum-microwave drying of parsley gives less hay flavour.

It is suggested that the hay like off flavour is formed by oxidation of unsaturated fatty acids or polyenes. As a consequence, I would suggest not to chop the parsley (or at least leave large pieces intact) to limit the exposure to oxygen. After parsley has been added, the mixture should be mixed carefully to keep the leaves intact. I used finely chopped parsley when I made the marshmallows in order to increase the release of volatile compounds from the parsley, and I think this is the main reason why I got the hay like off flavour.

banana-parsley-marshmallow-1.jpg
Whip until you get a thick, creamy texture.

banana-parsley-marshmallow-2.jpg

banana-parsley-marshmallow-3.jpg
Spread in a pan greased with butter/fat and sprinkled with powdered sugar.

banana-parsley-marshmallow-5.jpg

First experiments with sodium alginate

Friday, March 30th, 2007

Here’s some pictures and a video of my first experiments with sodium alginate and spherification. I used sodium alginate from the Texturas series and calcium chloride from a drug store. Needless to say, I’m very fascinated by the texture and the whole process. I have blogged about the chemistry behind previously.

Materials used:
2.0 g sodium alginate
200 g water (with low calcium content!)
50 g blueberry syrup

2.5 g calcium chloride
500 g water

Procedure:
2 g sodium alginate and 200 g water were mixed vigourously in blender. The mixture was then left to stand for some hours to get rid of the air bubbles. 50 g blueberry syrup was then added to the sodium alginate solution. A calcium chloride bath was prepared by dissolving 2.5 g calcium chloride in 500 g water. The sodium alginate/blueberry mixture was dripped into the calcium chloride bath using a plastic syringe with a steel cannula. After 1-3 min the pearls were removed and rinsed with water.

More detailed procedure with pictures and video:
I had to obtain a scale with a 0.1 g accuracy to weigh out 2.0 g of sodium alginate (my first experiments using a normal kitchen scale failed). The model I got cost about $100 and is inteded for school laboratories. Amazon provides several scales with this accuracy.

alginate-1.jpg

I used a blender to dissolve sodium alginate in water. This incorporates a lot of air in the mixture which we don’t want. It could possibly be avoided by using an immersion blender/mixer. However, I just left the alginate solution on the bench and after 3-4 hours the air bubbles had all escaped from the solution.

alginate-2.jpg

Plastic syringes and cannulas can be obtained from your local drug store or pharmacist. I found it was easier to produce evenly sized drops with a sharp cannula (CAREFULL!) than with just the plastic tip of the syringe. This of course depends on the viscosity of the solution. By thickening (with xanthan for instance) you can produce larger drops.

alginate-6.jpg

After 1-3 min the spheres were removed from the calcium chloride solution and rinsed with clean water. I dried the spheres carefully using a kitchen towel or paper.

alginate-7.jpg

alginate-3.jpg

Definitely looks like caviar when presented on a spoon like this!

alginate-4.jpg

Larger spheres were made by filling a small measuring spoon with the alginate mixture (I used a syringe for this so the outsides of the spoon would not be covered with alginate solution) and carefully emptied it into the calcium chloride bath. It takes some trial and error to achieve good results.

alginate-5.jpg

The spheres are suprisingly robust and can be handled without rupturing.

alginate-8.jpg

If cut with a knife, the spheres rupture and the liquid contents flows out.

alginate-9.jpg

The small spheres didn’t taste much, so I could have added more blueberry syrup. The large spheres however had a nice taste. The surprise element when they rupture in your mouth is very nice!

Practical molecular gastronomy, part 4

Saturday, March 17th, 2007


(Photo by vintage_patrisha at flickr.com)

4. Learn how to control the texture of food

Taste and flavour normally get more attention when food is discussed, but the texture of food is equally important and our tongue is very sensitive, not only to taste and temperature, but also to the texture of food. The texture of food determines it’s mouthfeel and it is related to many physical properties of the food. Wikipedia lists the following aspects of mouthfeel (click to see the full description of each aspect) which can be useful when analyzing food:

Adhesiveness, Bounce/Springiness, Chewiness, Coarseness, Cohesiveness, Denseness, Dryness, Fracturability, Graininess, Gumminess, Hardness, Heaviness, Moisture absorption, Moisture release, Mouthcoating, Roughness, Slipperiness, Smoothness, Uniformity, Uniformity of chew, Uniformity of bite, Viscosity, Wetness

I will barely scratch the surface of how texture can be controlled by highlighting a couple of topics and point you to further resources. Hopefully it will spark your interest and give some new ideas for you to play with in the kitchen. Those interested in a comprehensive review of food texture are referred to the CRC handbooks on food texture (volume 1: semi-solid foods, volume 2: solid foods).

What determines the texture of food?
Put very simple, it’s the relative amounts of air, liquid and solids that determines the texture of food. This is complicated by the fact that liquids have different viscosities. Furthermore the air, liquid and solid ratio is not necessarily constant. A liquid can solidify or evaporate, solids can melt or dissolve, and air bubbles can escape during cooking or storage. An elegant but quite abstract way of describing the complicated mixtures of air, liquids and solids found in food, is to use the CDS formalism (CDS = complex disperse systems), introduced by Hervé This.


(Photo by Subspace at flickr.com)

How can texture be controlled and changed?
Texture can be controlled by temperature, pH, air/liquid/solid ratio, osmosis, hydrocolloids and emulsifiers - to mention a few. Here’s some examples:

  • Heating induces a change in the structure of proteins referred to as coagulation or denaturation. Typical examples are the boiling of eggs and the cooking of meat. When proteins denature they contract and become firmer. There are several helpful tables relating the doneness of different meats to temperature.
  • At around 70 °C (160 °F) collagen, the connective tissue in meat, turns into gelatin. As a result the meat becomes more tender, which is desireable in stews and other slow cooked meats.
  • Heat causes air/gas to expand and water to evaporate to give a foamy/airy texture. For example, experiments have shown that it is mainly the evaporation of water that causes a soufflé to rise.
  • Heat will cause certain hydrocolloids to solidify (for exaple methyl cellulose) whereas it will cause others to melt (such as gelatin).
  • Brining meat can greatly improve it’s texture and juicyness. This is done by immersing the meat in a 3-6% salt solution from anyhere between a few hours to two days before cooking.
  • Frozen water in the form of tiny ice crystals are important for the smooth texture of sorbets and ice cream. Ice cream that has been partly melted and frozen again will grow larger ice crystals that impart a coarser texture to the ice cream.
  • Acidic solutions (low pH) can cause proteins to denature. This allows fish to be cooked without the use of any heat. An example is the use of lime juice in ceviche.
  • Emulsifiers, thickeners and gelling agents have almost become synonymous with molecular gastronomy for many. They can greatly alter the texture of foods and typically only a very small amount is required. Where gelatin was the only gelling agent videly available to cooks in Europe and America only a decade ago, this has changed with the advent of many internet suppliers of speciality ingredients.
  • Cooking under vacuum can create new and exciting textures. First of all it’s a way of removing excess water without having to raise the temperature all the way up to 100 °C. When the water is removed, this will create pockets of air in the food, and when the pressure is released, the liquid surrounding the food that is prepared will rush in and fill these pockets. There is a commercially available vacuum cooker, but a DIY version can be made from a pressure cooker and a vacuum pump.

  • (Photo by Trinity at flickr.com)

  • Green leaf vegetables such as lettuce loose water upon storage. As the pressure inside the cells drops, the leaf becomes softer. By immersing the leaves in cold water for 15-30 min, thanks to osmosis, water will enter into the cells again. As the pressure increases, the leaves become crisper.
  • Air bubbles can greatly modify textures, and foams really are ubiquitious (which becomes obvious if you read the book “Universal foam - from cappuccino to the cosmos”). Ferran Adria’s espumas have become very popular, as has his recent invention, the Espesso. Air bubbles are also very important for the texture of ice cream, in fact ice cream is nearly 50% air (just consider the fact that ice cream is sold by volume, not by weight!).
  • A very recent addition to the modern kitchen pantry is the enzyme transglutaminase. The enzyme acts like a meat glue and Chadzilla has nice blog post on his transglutaminase experiments.
  • There are also enzymatic counterparts of transglutaminase available: proteolytic enzymes also known as proteases. You can find them in pineapple (bromelain/bromelin), papaya (papain), figs (ficin) and kiwi (actinidin) - and they are capable of degrading proteins and muscle tissue. Despite this, they have only found limited use in marinades, as their action can be difficult to control (as Nicholas Kurti experienced, look for the “But the crackling is superb” link).
  • When mixing flour and water, glutenin and gliadin react to form gluten which gives bread it’s elasticity and plasticity. Addition of 1-2% salt to bread tightens the gluten network and increases the volume of the finished loaf. Similarly, addition of 1% oil to the dough (after the first kneading) can further increase the volume. Larger amounts of fat added before kneading will interfere with the formation of long gluten strands, hence the name shortening.
  • The no-knead bread that recently hoovered around in the blogosphere challenges the conventional wisdom that bread needs kneading to get a good texture.
  • Once bread is baked, the staling process starts. Staling does not necessarily involve loss of water from the bread and is caused by crystallisation (or retrogradation) of starch. In this process water molecules are trapped. The process proceeds fastest at 14 °C, but is halted below -5 °C. This is the reason why bread should be stored at room temperature. The staling process can be slowed down by addition of an emulsifier such as lecithin which is abundant in egg yolk.
  • A way of turning high fat foods and oils into powders is by the use of tapioca maltodextrin. Hungry in Hogtown has shown how Nutella can be turned into a powder.
  • *

    Check out my previous blogpost for an overview of the tips for practical molecular gastronomy. The collection of books (favorite, molecular gastronomy, aroma/taste, reference/technique, food chemistry) and links (webresources, people/chefs/blogs, institutions, articles, audio/video) at khymos.org might also be of interest.

    Chow: Behind the scenes at Alinea

    Monday, February 26th, 2007

    deconstructing-alinea.jpg
    The red sheet (in the not yet finished dish) is made by heating Campari, beet root juice, salt and sugar, followed by addition of agar agar. The color and texture look marvelous!

    Chow has a nice picture-by-picture guide (featuring photos by Stephanie Willis) to the dish “Short rib - beets, cranberry, Campari” served at Alinea.

    …If only it were that simple. Chef Grant Achatz says the actual ingredients are “short rib, beet-Campari juice, roasted baby golden beet, beet-green marmalade, braised beet greens, beet pâte de fruit, beet chips, three different types of fennel garnish, cranberry sauce, caramelized fennel purée … man, I guess that is a lot.” A colleague reminds him about fennel pollen, cranberry powder, and Murray River salt.

    Scientific chocolate tasting kits

    Monday, February 19th, 2007

    Dominique & Cindy Duby, chocolatiers based in Canada, have put together two “scientific chocolate tasting kits” (one, two). Some of the science behind is explained in their “tasting notes” (copy the text into a wordprocessor to read it). For a review of the first kit, check out Rob and Rachel’s blogpost over at Hungry in Hogtown.

    The kits illustrate the use of various hydrocolloids to produce foams, gels, dispersions, emulsions and pearls. The principle of flavor pairing is illustrated and binary taste interactions are explored. They also include experiments to explore crunchy vs. soft textures. Each kit comes with four different experiments and enough ingredients to make 8 servings. Furthermore they let you serve every experiment at two different tempereatures. This is neat because is allows you to explore the great influence temperature has on texture and aroma. Each kit sells for $125 - expensive yes, but from the presentation it seems like a good bundle.

    Science tasting kit no. 1
    skv05.jpg

    The following is illustrated in kit no. 1:

      Experiment 1: foaming of pectin and gelatin gels, spherification of a fruit juice/chocolate emulsion (there’s no info on this, but I guess the spherification is alginate based)
      Experiment 2: explore how temperature influences sweet and bitter tastes, make a chocolate emulsion (with cream, strawberry juice, wine, cocoa butter and oil) and serve it at two different temperatures
      Experiment 3: explore the fact that “taste” is 80% smell, illustrate how salt can suppress bitterness, use a special powder made from an aromatic liquid and maltodextrin which is then dried under vacuum with microwaves (sort of like freeze drying, only this uses microwaves in stead)
      Experiment 4: Hervé This’ double dispersion chocolate “cake” made with chocolate and egg white foam which is set in a microwave oven (described in his Angewante Chemie article on molecular gastronomy), short lived crunchy texture, flavor pairing is illustrated by combining cumin and coffe with chocolate

    Science tasting kit no. 2
    skv06.jpg

    Kit no. 2 starts of by exploring culinary “equations” which are remarkably similar to (yet somewhat less comprehensive than) the CDS formalism described by Hervé This elsewhere. The following is illustrated in the second kit:

      Experiment no. 1: a “whisky” is constructed from ethanol lignin, aromatic aldehydes, sugars, acetic acid, oak flavor, vanilin, malt etc.
      Experiment no. 2: ice cream is made without churning using foamed egg whites to incorporate air (is this what Italians refer to as a frozen parfait?)
      Experiment no. 4: meringues floating on a pool of custard sauce drizzled with caramel

    If you’d rather reverse engineer the dishes, my list of hydrocolloid suppliers might come handy. The “tasting notes” also gives you some hints if you want to have a go on your own.


    Close
    E-mail It