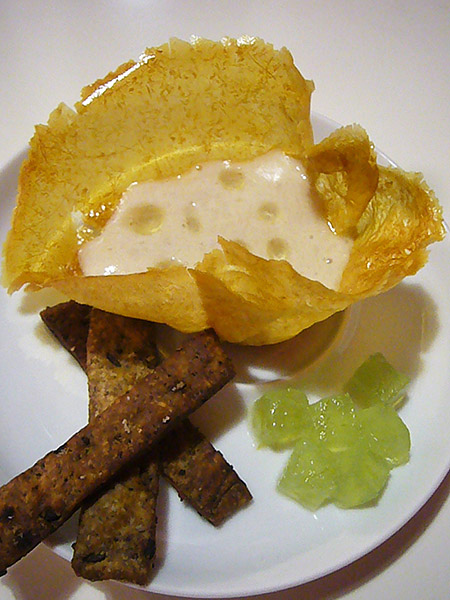
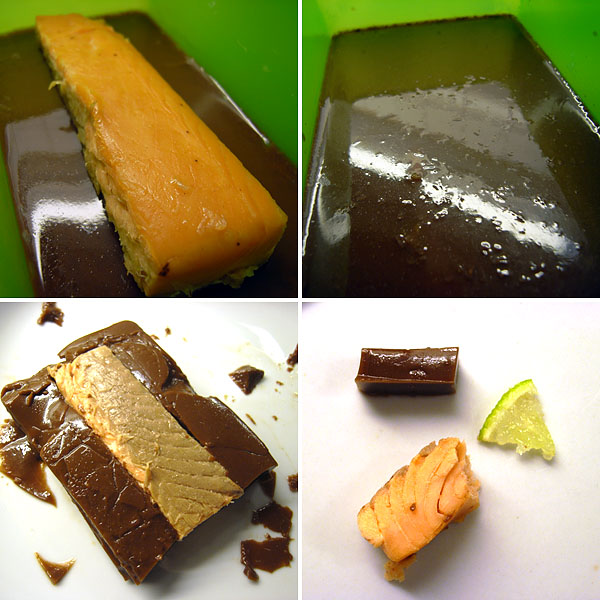
Archive for the ‘recipe’ Category

Hydrocolloid recipe collection v.2.2

Friday, December 19th, 2008

An updated version of “Texture – A hydrocolloid recipe collection” is now available for download (version 2.2). There are two file sizes available: screen resolution (~1 MB) and high resolution for printing (~5 MB). Some recipes have been added bringing the total number up to about 270 recipes. Apart from this the version includes corrections of typos and updates of indexes and the supplier list. There is a new index for alcoholic preparations plus a small glossary. Again I should mention that I’m very grateful for feedback from readers and users of this recipe collection. Thank you very much with helping me improve the document! If you find typos, wish to comment on something or have suggestions on how to improve the collection, please do not hesitate to write me an email at webmaster (at) khymos (.) org or just write a comment in the field below.

TGRWT #12: Chanterelle pie with apricots

Monday, December 1st, 2008

In the end I was able to find fresh chanterelles and therefore ready for TGRWT #12 with a last minute preparation and blogpost (the round-up of TGRWT #12 has already been posted). The chanterelles were imported from Poland and quite expensive and I was eager to smell them and see if I could recognize the smell reminiscent of apricots (as a commenter pointed out to my announcement: even wikipedia states this fact). But to be honest I was quite disappointed – there were no traces of apricot aroma in my batch. But there was an earthy note. I tasted the chanterelles throughout the preparation, but at no point were they close to what I had tasted earlier and hoped for. But once I’d added some butter and pepper they where much better! Regarding the apricots I didn’t even try to find fresh ones and got the canned variety from the start. They were quite OK and I rinsed them with water a couple of times to wash away the syrup they came in. I imagined I would like to make a pie so I googled for chanterelle pies and quiches and found some inspiration there. And

Chanterelle pie with apricots
(more…)

TGRWT #11: Ginger-Glass bowl of banana mousse with cloves biscuits and lemongrass jelly

Thursday, October 30th, 2008

I received the following contribution for TGRWT #11 from Alessio Fangano, and since he doesn’t have a blog I post his contribution here in extenso. Enjoy!


Photo: Alessio Fangano

Ginger-Glass bowl of banana mousse with cloves biscuits and lemongrass jelly
All the ingredients are meant for 4 servings.

Cloves Biscuits
1 egg yolk
25g flour
3 tea spoons of groundnut oil
4g whole cloves
Fleur de sel
Groundnut oil to fry

Ground cloves, flour and oil in a mixer. The cloves do not need to be completely pulverized; the little shards will provide sparks of taste when bitten.

In a bowl fold in the flour mixture and the egg yolk (add little bit of water if needed). Knead a bit the dough before rolling it in a thin foil (2-3 mm).

Cut in rectangular strips approximately 7×1 cm, sprinkle on top 3-4 grains of fleur de sel on each strip and let dry for 3h before frying in hot oil.

Ginger Crisp cup
150g egg white
75g fresh ginger peeled
150g water

Peel the ginger, cut it in small pieces and ground very finely in a mixer adding water. Strain the liquid pressing the pulp trough a fine sieve. Add the liquid to the egg white with a teaspoon of the grinded pulp. Mix the whole properly.

Pour some of the mixture on a small no-stick skillet to a thickness of around 2mm. Put on the fire on low heat to let the water evaporate. It does not have to boil.

When the border will be dried out and some part of the interior will start to (ca 30 min), lift the film out of the skillet and place over the back of a bowl you will use as mold. Place a second cup over it to keep the film in shape and put into the oven at 120C for another 30min. After 10-15min take away the upper cup leaving the back of the crisp cup exposed. If at the end of the 30 min the crisp is too clear looking, just unmold it and put it in the oven for another 5-10min keeping an eye on it.

Proceeds this way for the rest of the mixture.

These crisps may be kept for a couple of days in a dry place.

Lemongrass Jelly
40g fresh lemongrass
1 teaspoons lemon zest
170g water
0.17g agar (1%)
Green food color

Put water and the lemongrass thinly chopped in a pot. With the lid on, heat it over low fire to around 70C. Let infuse for 2h away from heat. Filter the liquid with a sieve pressing the liquid out of the lemongrass. Add few drops of the colorant to the infusion to obtain a fresh mint green.

Heat few spoons of the liquid with the lemon zest and add the agar powder. Boil for 2-3 minutes. Away from heat mix in the rest of the liquid and pour in a mould. The resulting jelly will need to be cut in cubes, so use a flat shallow container. Refrigerate until set before cutting.

Chilies Consommé
25g water
2 small green Indian chilies
0.05g agar (0.1%)

Grind the chilies and the water in a blender. Heat up the liquid, add the agar powder and boil for 3 minutes. Put the liquid in a mold (glass for instance) and freeze overnight. Place the resulting iced-gel over a sieve and let the liquid drip on a bowl.

Banana Mousse
150g Ripe Banana
4 teaspoons rose water
1-2 teaspoon(s) chilies consommé
0.7g (0.5%) methylcellulose
1-2 pinch(s) curcuma (optional)

Disperse the methylcellulose in some warm water. Let it hydrate overnight. Purée the banana in a blender. Transfer in a bowl and flavor with the rose water and chilies consommé. If you wish, you can add a bit of curcuma to make the whole looking more yellowish-golden. Mix in the methylcellulose and foam with an immersion blender.

Keep in mind that the banana will darken over time so prepare the mousse shortly before serving.

Presentation
Pour the banana mousse in the ginger crisp bowl. Put over a white serving plate with the cloves biscuits and jelly cubes. Spread over the banana mousse drops of cloves oil made blending cloves with groundnuts oil.

Taste Sensations
The biscuits results fragrant, the salt underlining their consistency. In them cloves appear as a back taste that spikes when biting over a shard releasing a sensation of freshness.

The foam exhales an equilibrated scent of rose water and banana. The sweet banana taste is followed by the rose aroma and the hit of the chili spiciness. The sweetness and sticky consistency of the banana complements quite well the balsamic nature of cloves in the biscuits.

The crisp’s ginger taste fuses very well with the banana foam leaving a whole mouth sensation of light spiciness.

The lemongrass jelly helps cleaning the mouth, leaving a fresh sensation that adds up to the left over spiciness from the crisp.

In the complex, the recipe works quite well though the cloves biscuits need some further development.

TGRWT #11: Pork tenderloin with banana and cloves

Monday, October 27th, 2008

I’m a big fan of using bananas in savory dishes, so for TGRWT #11 I decided to make:

Pork tenderloin with banana & clove sauce
450 g pork tenderloin
2 bananas, sliced
10-15 cloves (less if you use ground cloves)
black pepper, ground
cooking oil of choice
1-2 T crème fraîche

Pack meat in plastic bags with a little oil, banana slices, cloves and pepper. Suck out air and seal. Sous vide* for 60 min or more at 60 °C. Leave meat to rest while making sauce: purée bananas with some cloves and crème fraîche using an immersion blender. Add ground pepper and salt to taste (use powdered meat stock if desired). Keep sauce warm in a water bath. Sear the tenderloin slices on both sides. Serve with rice and glaced carrots.

* Can one use “sous vide” as a verb, just as to google has become a verb?

Verdict: I enjoy the combination of sweet and salty tastes in the banana sauce. I goes very well together with the pork. The meat was perfect throughout with a pale pink color (quite difficult to reproduce this color correctly when processing the picture…). The sauce was quite thick and should be served in moderation since it’s quite sweet.

I actually prepared 4 different packs of meat for the sous vide. Meat with and without bananas and/or cloves. What I found out was that the meat didn’t really take up much of the banana flavor, so I could just as well have put the banans and the cloves for the sauce in a separate bag which would have allowed me to leave the meat in the water while I was making the sauce.


I used “freezing” bags which are thicker and sucked out the air with a vacuum cleaner :)

Cherry jams with a twist

Sunday, August 3rd, 2008

We have a small garden with a single tree. It’s a sweet cherry tree and this year must have been one of the best ever. In May it was overthrown with flowers. Last year I made some jam which came out OK, but the drawback with sweet cherries is that their taste doesn’t really compare with that of sour cherries. They’re good to eat, but not as good for cooking and jam as their sour cousins. The summer last year was quite wet and cold which could explain the fad taste, but this year however has been quite hot and the cherries grew darker and sweeter as summer proceeded.

I decided to give cherry jam another try. To improve the flavor even further, I was pondering on adding spices. My mom has previously added cloves and cinnamon to plums when making jam. The first place I looked was under cherries in the book “Culinary artistry”. Among the numerous suggestions for flavor pairings it was black pepper and lemon that caught my attention. Who would have thought? I made a small test batch and was quite pleased by the “bite” provided by pepper so I proceeded with a full batch. I used a pre-mixed gelling sugar from Danisco sugar (which contained sugar, pectin, a preservative and an acid), but you could use whatever pectin you have at hand. Just follow the instructions on the pack (more on the science further down).

Having added pepper and a little of the sugar to get an idea of how it would turn out, it almost felt as if ginger was already there so I added a little more to accentuate that. The other spices were added to round everything off. The pepper taste is quite noticeable if you eat the jam by itself, but on buttered bread or toast it’s really nice. I also suggest that you try it with different semi-soft and hard cheeses such as Emmentaler, Jarlsberg, Prästost, Parmesan or Pecorino. My wife thinks it’s a little to much pepper, but for me it’s just perfect. In German this jam would be known as a Herrenmarmelade (a gentleman’s jam). If you’re not very fond of pepper however it’s a good idea to start with half the amount of pepper.

Spicy cherry jam with pepper
3.7 kg depitted sweet cherries
7.0 g black pepper, ground
0.8 g cloves, ground
0.7 g ginger, ground
1.3 g anis seeds, ground
0.8 g star anis, ground
zest and juice from 1/2 lemon
2.2 kg gelling sugar (with pectin and preservative)

Place enough jars in a cold oven and heat to 120-130 °C to sterilize them (this is more convenient than in boiling water). Depit cherries (conveniently done with a cherry stoner) and cut in four (helps you discover those stones that eluded the cherry stoner). Add spices and bring to boil. Remove any remaining pits that float up to the surface. Pureé with immersion blender (hopefully you will not hear the sound of cherry pits being crushed at this stage). Add gelling sugar. Let boil and skim of foam. Fill the hot jars immediately. And remember – as all chemists know – hot glass looks just like cold glass! Use a canning funnel to avoid spilling jam on the sealing surface of the jars. Leave to cool for 10-15 minutes and then screw on lids. I usually wipe the inside of the lids with 40-60% alcohol and then screw them on tightly before the alcohol has evaporated. There’s more at the end regarding the procedure for closing the jars.

This way of canning is very convenient and the jam will keep for several years in closed jars if kept in a cool, dark and dry place. This is due to the high sugar concentration (sugar binds water, and unless water is available, molds won’t grow), the low pH and – if added – the presence of preservatives. A more tedious way is to sterilize the jars after filling by boiling in water. This is no doubt the best way to sterilize the jars, but for jams with a high sugar content and a low pH it’s a little overkill. The National Center for Home Food Preservation in the US has more information about this (but notice that there are different traditions – I wonder if there is a divide between Europe and North America?). There are also many books about this and good place to start would be the “Ball Blue Book of Preserving”, better known as BBB among home canners. If you chose this method you should probably use a little more pectin as the additional heating at low pH will degrade some of the pectin making the jam more runny.

Using black pepper in a jam worked really well so I googled this and found Clotilde’s recipe for a strawberry jam with pepper and peppermint. She got it from Christine Ferber, author of “Mes confitures: The Jams and Jellies of Christine Ferber” which has recipes organized according to season. As mint was also mentioned as a good flavor pairing for cherries in “Culinary artistry” I thought I’d give pepper and peppermint a try.

Cherry jam with pepper and peppermint
2.2 kg depitted sweet cherries
1.3 kg sugar
2.4 g fresh peppermint leaves
2.8 g black pepper, ground
zest and juice of 1/2 lemon
1 pack of Certo fruit pectin*

Depit cherries and cut in four. Add pepper and peppermint and bring to boil. Remove any remaining pits that float up to the surface. Pureé with immersion blender. Add pectin and stir until dissolved. Add sugar. Let boil and skim off foam. Sterilize and fill jars as in the previous recipe.

[ * The Certo pack weighs 70 g and contains sugar (for easier dispersion of the pectin), citrus pectin, citric acid to get the right pH for gelling and a preservative (ascorbic acid). ]

This jam was dominated by peppermint and the pepper could barely be noticed. I found it very refreshing and there is a surprise element as the red color does not suggest the presence of peppermint. Apart from the obvious use as a bread spread, I can imagine that this jam would be very nice with roasted meat, especially lamb, reindeer, elk and perhaps also wild game.

Having experimented with different spices and peppermint, my wife asked me to also make a batch of plain cherry jam which I happily did. But next year I would like to try making cherry jam with red wine!

As you can imagine, I couldn’t do all this without offering the chemistry behind some thoughts. Pectin chemistry is quite complicated though and there are several types available (low methoxyl, high methoxyl and amidated – so far I’ve only included the two first in “Texture – A hydrocolloid recipe collection”). Commercial packs of pectin for home use do normally not specify which type of pectin they contain, but I assume that it is the high methoxyl which gels in the presence of sugar and at low pH (as opposed to the low methoxyl which requires calcium ions to gel). The easiest is probably to follow the instructions that come with the pack you chose. Always add pectin before you add sugar (unless you premix them). The reason for this is that the gelling of high methoxyl pectins is promoted by sugar. If you add sugar before pectin, it will be very diffult to get the pectin properly dispersed and dissolved (it can be done with an immersion blender though – I’ve tried that once). Ready to use pectin is often pre-mixed with an acid to get the pH below 3.5 which promotes gelling. Citric acid is often used, and plain lemon juice will also do the job. Lowering the pH is especially important when using ripe or over ripe fruit as these can be less acidic and also contain less pectin if we are talking about pectin containing fruit. After the pectin and sugar have been added, the jam shouldn’t boil for more than a couple of minutes as pectin is not very heat stable.

There are also a couple of claims found in jam recipes which I have been wondering about:

Skimming: Almost all recipes I have seen for jams call for rapid skimming of the foam which formes when the jam mixture boils. One explanation I’ve seen is that this is done to prevent growth of mold, as these apparently grow more easily in the foam. There are certainly airborn molds, but the bubbles in the foam come from the jam as it boils, so it’s been very hot and presumably sterilized. So I’m simply wondering if the whole skimming is about esthetics – which is is still a good enough reason to me (but then I wish the recipes could state that!).

Turning jars upside-down: One thing that has puzzled me for a time is why recipes recommend that the jars should be turned upside-down. I’ve googled and checked several books and have come up with a couple of explanations (but most recipes only state that it should or shouldn’t (!) be done, without giving any reason). The fun thing is that the suggested time for how long the jars should remain turned upside-down varies from 2 minutes to several hours when the jam is cool and has set.

  • One site claims it is done to prevent larger pieces of fruit from settling to the bottom. This does make sense, and in that case there is no reason to do it if the fruit has been puréed.
  • A blogpost commenter suggests that turning the jars upside-down for 5 minutes makes sure the inside of the lid gets sterilized too. The temperature of the jam at this time is probably somewhere around 95 °C, so it does seem reasonable that it might kill some molds residing on the lid. I’d give this a thumbs up. Any microbiologist who could confirm this?
  • Personally I have speculated whether turning the jars upside-down would allow water (or jam to be precise) to be drawn into the seal by capillary action and that this helps to make a perfect seal, but several sites emphasize that this should not be done to prevent the seal from being broken (these sites assume that a canner has been used – i.e. sterilizing the filled jars with lids in boiling water for 5 to 10 min). I’m not sure, but I wonder if there is a difference here between screw caps and glass lids with rubber bands?
  • A last reason to turn jars upside down would be to prevent the water evaporating from the hot jam to condensate on the lid. If the jars are left to cool upside-down for 10-15 minutes, but turned back before the jam sets this will prevent water to condense on the lid and drip back to the surface of the jam. This water could potentially mean better conditions for growth of molds. This theory is also supported by the suggestion found in old cookbooks where the jars are left to cool completely without lids to let the surface dry and form a skin, and then covered with a filter paper dipped in alcohol before tying them up with pergament paper and string.

The conclusion so far regarding turning the jars upside-down can be summed up as follows. You should chose of the three methods:

  • Cover with lid immediately and turn upside-down until cool enough to handle (~40-50 °C). Then return to upright position. This will prevent condensation of water on the lid, it might help create a better seal and it could possibly knock out some molds on the lid. The jam however will most likely not have set yet.
  • As above, with the only difference that you leave the jars upside-down until cool and set. This means that the air pocket will not be below the lid but at the bottom of the glass when turned back to the upright position.
  • Allow the jam too cool without lids until a skin has formed and the jars are cool enough to handle. This prevents condensation of water on the lid. Wipe the inside of the lids with the highest percentage alcohol available (but do NOT use denatured alcohol!) – typically it would be 40% or 60% – and screw on the lid before the alcohol evaporates. The skin formed will be less suceptible to growth of mold because there is less water present and because of the presence of alcohol.

Hydrocolloid recipe collection v.2.1

Wednesday, June 25th, 2008

An updated version of “Texture – A hydrocolloid recipe collection” is now available for download (version 2.1). The version includes corrections of typos, minor additions to the property tables plus an important update in the gelatin section and a recipe for agar filtration. Read on for details!

I’m grateful for feedback from several readers pointing out that the size of gelatin sheets is made to compensate for different bloom strengths. In other words, one gelatin sheet will gel a given amount of water, regardless of the size of the gelatin sheet. To the best of my knowledge, this convention seems to have been adopted by most gelatin producers.

All gelatin based recipes have been updated to reflect this and most of them now give the amount of gelatin both in grams (for a platinum type, 240 bloom gelatin) and in number of sheets. I’ve also included a formula for conversion between different bloom strengths. This formula differs from what has been published earlier (no square root), but by testing the formula for given gelatin sheet bloom strengths and weights I got better results by simply multiplying the mass by the ratio of the bloom strengths. If you know more about these formulas, please leave a comment or email me.

Checking the gelatin recipes I discovered that the recipe “Strawberry spheres” originally called for “Sosa vegetable gelatin” which is not gelatin but a mixture of carrageenan and locust bean gum which are dispersed with maltodextrin. Since the exact amount of carrageenan and locust bean gum are not known I’ve deleted the recipe (but I’m sure you could achieve the same coating effect with plain gelatin, perhaps a 3-4% solution to render it viscous so it will cling the the spheres).

Thanks to feedback from a reader there is also recipe now for agar filtration (based on a Spanish forum post). This works just like gelatin filtration, but is much faster. Apparently you get more or less the same results with regard to clarity, flavor and color.

If printing the collection, make sure the hydrocolloid properties table is rotated so it prints correctly. This table is presented in landscape format. The right most column of the first page is gelatin – if you don’t see it, try printing these pages again. The pages are optimized for printing on A4. If printing on Letter sized paper, make sure you check the “resize” or “fit to paper” option in your pdf reader.

Thank you for comments, corrections, recipes and other feedback! As always, I can be reached at webmaster a t khymos d o t org.

Liquid nitrogen ice cream

Monday, June 2nd, 2008

I recently became aware of an excellent site focusing solely on liquid nitrogen ice cream! Ever heard about “The institute for liquid nitrogen ice cream experimental studies” or TILNICES for short? They’re located at the Department of Chemistry at the Tennessee Technological University. It seems that the site is still under construction, but several recipes are already available plus a number of papers (available for download as pdf files).

[Thanks to John Placko on the MG mailing list for mentioning the site]

Hydrocolloid recipe collection v.2

Wednesday, May 21st, 2008

Texture – A hydrocolloid recipe collection
It’s a pleasure for me to announce that an updated version of the hydrocolloid recipe collection is available for free download as a pdf file (73 pages, 1.8 Mb).

What’s new?
Several new recipes have been added (now counting more than 220 in total), including recipes with cornstarch, guar gum, gum arabic, konjac and locust bean gum. All in all 14 different hydrocolloids are included (plus lecithin which technically isn’t a hydrocolloid). In each section recipes are now sorted according to the amount of hydrocolloid used. The appendix has been updated with tables for comparison of hydrocolloid properties, hydrocolloid densities and synergies. The perhaps biggest change is that all recipes have been indexed according both to the texture/appearance of the resulting dish and according to the hydrocolloid used. Let’s say you want to make spheres, this index will show you which hydrocolloids can be used (that’s right – there are other possiblities than sodium alginate) and list the example recipes.

Foreword
A hydrocolloid can simply be defined as a substance that forms a gel in contact with water. Such substances include both polysaccharides and proteins which are capable of one or more of the following: thickening and gelling aqueous solutions, stabilizing foams, emulsions and dispersions and preventing crystallization of saturated water or sugar solutions.

In the recent years there has been a tremendous interest in molecular gastronomy. Part of this interest has been directed towards the “new” hydrocolloids. The term “new” includes hydrocolloids such as gellan and xanthan which are a result of relatively recent research, but also hydrocolloids such as agar which has been unknown in western cooking, but used in Asia for decades. One fortunate consequence of the increased interest in molecular gastronomy and hydrocolloids is that hydrocolloids that were previously only available to the food industry have become available in small quantities at a reasonable price. A less fortunate consequence however is that many have come to regard molecular gastronomy as synonymous with the use of hydrocolloids to prepare foams and spheres. I should therefore emphasize that molecular gastronomy is not limited to the use of hydrocolloids and that it is not the intention of this collection of recipes to define molecular gastronomy.

Along with the increased interest in hydrocolloids for texture modification there is a growing scepticism to using “chemicals” in the kitchen. Many have come to view hydrocolloids as unnatural and even unhealthy ingredients. It should therefore be stressed that the hydrocolloids described in this collection are all of biological origin. All have been purified, some have been processed, but nevertheless the raw material used is of either marine, plant, animal or microbial origin. Furthermore hydrocolloids can contribute significantly to the public health as they allow the reduction of fat and/or sugar content without loosing the desired mouth feel. The hydrocolloids themselves have a low calorific value and are generally used at very low concentrations.

One major challenge (at least for an amateur cook) is to find recipes and directions to utilize the “new” hydrocolloids. When purchasing hydrocolloids, typically only a few recipes are included. Personally I like to browse several recipes to get an idea of the different possibilities when cooking. Therefore I have collected a number of recipes which utilize hydrocolloids ranging from agar to xanthan. In addition to these some recipes with lecithin (not technically a hydrocolloid) have been included. Recipes for foams that do not call for addition of hydrocolloids have also been included for completeness. Some cornstarch recipes have been included to illustrate it’s properties at different consentrations. Recipes where flour is the only hydrocolloid do not fall within the scope of this collection as these are sufficiently covered by other cook books.

All recipes have been changed to SI units which are the ones preferred by the scientific community (and hopefully soon by the cooks as well). In doing so there is always uncertainty related to the conversion of volume to weight, especially powders. As far as possible, brand names have been replaced by generic names. Almost all recipes have been edited and some have been shortened significantly. To allow easy comparison of recipes the amount of hydrocolloid used is also shown as mass percentages and the recipes are ranked in an ascending order. In some recipes, obvious mistakes have been corrected. But unfortunately, the recipes have not been tested, so there is no guarantee that they actually work as intended and that the directions are complete, accurate and correct. It appears as if some of the recipes are not optimized with regard to proper dispersion and hydration of the hydrocolloids which again will influence the amount of hydrocolloid used. It is therefore advisable to always consult other similar recipes or the table with the hydrocolloid properties. The recipes have been collected from various printed and electronic sources and every attempt has been made to give the source of the recipes.

Since recipes can neither be patented nor copyrighted, every reader should feel free to download, print, use, modify, and further develop the recipes contained in this compilation. The latest version will be available for download from the static Khymos site and will also be announced here. I would like to thank readers for giving me feedback and suggestions on how to improve the collection. Feedback, comments, corrections and new recipes are always welcome at webmaster (a t) khymos ( dot ) org.

TGRWT #10: Pizza with blue cheese and pineapple

Tuesday, March 25th, 2008

pizza-stone-art.jpg
This piece of art was recently sold at an auction for $ 35 million USD! No … just kidding. Read on to find out more!

For the 10th round of TGRWT I decided to modify one of my favorite pizza recipes. As it already has some blue cheese I decided that I would just add som pineapple to the sauce and see how that would work out. Knowing that pineapple works quite well on pizza (at least I have childhood memories from a pizza place called “Aloha” where they served a “Hawaiian delight” pizza with pineapple, ham and cheese) I was quite optimistic about this combination.

pizza-close-up.jpg

Normally I don’t use a recipe for the dough. I only remember to use 1 dL water per person. Everything else is added ad lib. But to give you a proper recipe I measured all the ingredients. Using 4 dL water gives approximately 1 kg dough in total. This gives 3 pizzas with a diameter of about 26 cm, serving 3-4 people. If you like you can roll the dough out thinner and make 4 pizzas and stretch the sauce and toppings correspondingly.

pizza-rising-dough.jpg

Pizza dough
4 dL water
5 g salt
5 g fresh yeast
580 g flour (plain white)
20 g olive oil

Add salt and yeast to luke warm water (~37 °C) and stir to dissolve yeast. Add flour in portions, reserving about 40 g. Mix/knead well for a couple of minutes. The dough is quite sticky. Add the olive oil. Mix/knead more. Add the remaining flour and fold the dough a couple of times. Cover and let rise for 1-2 hours.

Addition of 2% oil helps to give a lighter texture. But mix/knead the dough first so you form the gluten network before you add the oil. Otherwise the oil will cover the glutenin and gliadin proteins and inhibit the formation of gluten, rendering the dough less elastic.

pizza-sauce-bluecheese.jpg

Pizza sauce
45 g sardines (I used King Oscar “Mediterranean style”)
3 t capers
2 T tomatoe paste
1 clove garlic
4 pineapple rings

Mix everything in a small food processor. (You can also add some olives if you like.)

Blue cheese sauce
75 g blue cheese
75 g crème fraîche

Crumble the blue cheese, add the crème fraîche and mix until smooth.

Toppings
1-2 onions, in rings
50 g pepperoni
100 g cheddar, grated

Assemble the pizza as follows. Roll out approximately 330 g dough and place it on a suitable pizza peel (if you forget this you won’t be able to transfer the pizza to the baking stone). Add pizza sauce, blue cheese sauce, onion rings, pepperoni and cheddar cheese. Transfer to a preheated pizza stone and bake at 250-300 °C until nicely browned. Depending on temperature this typically takes around 5-10 min.

pizza-animated.gif

The key to a good pizza is turning up the heat! I usually set my oven around 250 °C, but you can go even higher if you like. Secondly you want to use a pizza stone (also known as a baking stone) to get that nice oven spring and a crisp crust. The picture at the top of this blog post is just a close up of my pizza stone! The black speckles are the carbonized remains of cheese and pizza sauce. I’ve blogged about the science of pizza stones previously:

A baking stone is made from a porous ceramic material. It’s heat capacity is good (much higher than that of a metal plate/sheet) and as a result, when the cold dough is placed on the baking stone, it still has enough heat to make the pizza rise immediately. Secondly, the fact that the baking stone is porous lets it absorb moisture from the pizza. This is what gives the nice crisp crust as it transports moisture away from the pizza.

pizza-stone.jpg

Verdict:
The original version of this pizza (without pineapple) is one of my absolute favorites and tinkering a little with the recipe doesn’t change this. But even so I felt that the pineapple diluted the pizza sauce and that the sweetness took away too much of the saltiness of the pizza sauce. Unfortunately, when making the pizza sauce, I discovered that my tube of tomato paste was empty so I used ketchup in stead. In retrospect I see that this wasn’t a good choice as ketchup is quite sweet. Therefore it’s not fair to say that all the extra sweetness came from the pineapple, but it nevertheless contributed with a lot of sweetness.

The overall flavor was very nice though, and my wife thought this pizza was better. Personally however I prefer the “original”. But perhaps next time I’ll try to add pineapple chunks in stead of churning it together with the sauce so as to concentrate the pineapple flavour more and allow it to come in small “flavor packs” now and then. I think that might work better.

pizza-wine-closeup.jpg
Serve with red wine and a fresh salad!

Mai Tai flavored cocktail vauquelin

Tuesday, March 4th, 2008

Recently I received an email from Thorsten Spickenreuther, a German PhD student, who inspired by my post on vauquelins asked me whether I had made any cocktail flavored vauquelins yet. I gave him the details of what I had tried and encouraged him to experiment a little. Here’s a report which he sent me (and allowed me to share with you):

Cocktail Vauqueline – First Experiment

I started off with just one egg white and slowly added up to 100ml of almond syrup (i.e. water & sugar) and about 50ml of lime juice (i.e. acid) because the end result should be a Mai Tai flavoured Vauqueline. As it was already 2 am, my motivation for using a whisk was rather low, so my electric mixer had to do the job. Moreover, i didn’t have a metal bowl at hand, so the increase in volume was not as big as may have been expected – the result was about 1.5 liters of firm, stiff egg white foam.

pic1.jpg pic2.jpg

As my silicon moulds survive my microwave without problems, i thought ,,Why not using them here to get a nice pyramid shape for the planned Mai Tai flavoured dessert?” No sooner said than done, and after 8 seconds at 440W, the result looked quite nice. The volume increased a little and the foam maintained its shape very well. The pyramids came out of the moulds easily and even could be cut by pressing a spatula to the blade of a knife, cut and then separate (a two blade knife? …slightly reminds me of a Dire Straits song…). Using smaller moulds (hemispheres) was no problem, too.

pic3.jpg pic4.jpg

Okay, now we have a nice foam with an abundantly sweet’n’sour and almondy taste. But this is not Mai Tai yet and Trader Vic would turn in his grave. So we need at least some rum and a dash of orange curac¸ao. Adding the liquor (40-50ml), the foam broke down a little, but regained its firmness after a while of whisking and the final result was like before. I even did a quick-and-dirty dessert-decoration by adding caramelized kiwi slices and a bit of thickened passion fruit sauce.

pic8.jpg pic7.jpg

Oh… yes…… most important: The taste was excellent. You have to be a bit careful with the quantity of the syrup so the ,,drink” doesn’t get too sweet, but the Cocktail Vauqueline experiment sure was a success. You also have to be careful with the liquor – a further increase left me with a flowing mass and i wasn’t able to get a firm foam again, even after a long time of whisking (this may also be due to the long time of standing, the plastic bowl and the electric mixer with rather thick wires). For the future, i’m going to try some other cocktail flavours and how using fatty components like cream of coconut affects the stability of the foam in the end. I think the cocktail combination is suited best for creamy and juicy cocktails (i.e. ,,fancies”) but i will try something like Cuba Libre and Gin Fizz, too (although i think the ,,jelly-approach” is better for this type of cocktails). An interesting experiment would also be to use an iSi Whip with N2O charging to speed up the creation process.

pic9.jpg

If you want to contact Thorsten directly he can be reached by email on sylance [at] web [dot] de.