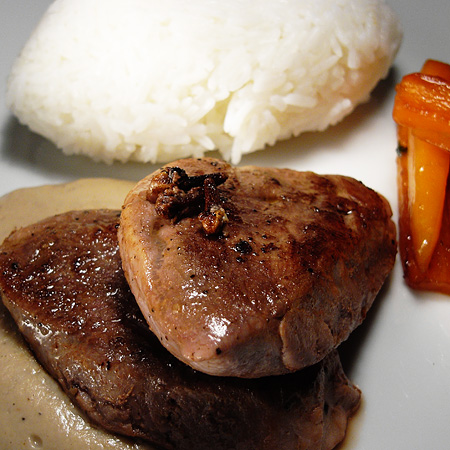
Archive for the ‘sous vide’ Category

Upcoming books on sous vide

Wednesday, June 25th, 2008

A number of books related to molecular gastronomy and food science will appear this fall – I’ve previously mentioned the Fat Duck and Alinea cookbooks. But there is more, much more! This time I would like to draw the attention to two books on sous vide which are due to appear in October. And notice how nice the titles compliment each other – one is under pressure, the other one under vacuum!

Thomas Keller, known from the French Laundry, Bouchon and per se, has written the book “Under Pressure – Cooking Sous Vide” (the Under Pressure title was also used by NY Times in a 2005 feature article on sous vide). According to the publisher, Keller and his chefs de cuisine have blazed the trail to perfection through years of trial and error and they show the way in this collection of never-before-published recipes from his landmark restaurants.

The book “Sous-Vide Garen im Vakuum” (Sous vide cooking under vacuum) by Viktor Stampfer (known from the Ritz-Carlton in Dubai) has received much less attention, but certainly deserves to mentioned. The title is in German, but do not despair – it seems to be a bilingual edition with German and English text (can anyone confirm this?), but so far it’s only available for preorder from the German Amazon. According to the publisher the book gives an introduction to the equipment used including sealing devices and recommended temperatures for cooking together with numerous recipes.

These are not the first books to appear on sous vide – enthusiasts have probably obtained one or more of the books by Roca, Farber, Ghazala, Leadbetter, Choain/Noël and Calmejane/Barrier – but I’m quite sure that the new books will complement these very nicely, and they will certainly be more available as several of the others have unavailable for some time.

Kitchen gadgets

Thursday, October 11th, 2007

Popular science magazine has an amusing article on “The future of food” which portrays Dave Arnold, apparently the “man behind the curtain of today’s hottest movement in cooking”. I don’t buy all of this, but he’s no doubt had a central role in bringing lab equipment into the kitchens of North American chefs and teaching them a little science. You might also want to check out their gallery of kitchen gadgets. Some of my favorites include (click the pictures to lanuch the picture gallery at PopSci magazine):

kitchengadget_whipper.jpg
For the Pros: The Whipper. Adds a touch of air to every bite.

Within reach of the dedicated amateur chef, indispensible for the professional chef: a whipper which you can charge with either carbon dioxide (for instance to make carbonated fruit) or dinitrogen oxide (too make foams/espumas or simply whipped cream).

kitchengadget_circulator.jpg
For the Pros: The Sealer and Circulator. Cooks in a bag to lock in juiciness.

Sous vide cooking is perhaps one of the most fascinating examples of science inspired cooking. The picture shows a vacuum sealer and a thermostated water bath circulator. If this is too expensive, check out my post on a simple and easy DIY sous vide.

kitchengadget_chemicals.jpg
For the Pros: The New Spice Rack. Chemicals the experimental home chef shouldn’t be without.

Last but not least: the different chemicals which become more and more available. I’ve put together a collection of hydrocolloid recipes which will help you get started using these fascinating chemicals. If you have troubles getting hold of these, my list of suppliers might help you.

Of course I’d like to put my hands on a Pacojet, an Antigriddle or a Gastrovac as well, but for a home kitchen, this gets too exotic and far too expensive. But – the most surprising gadget was the vacuum meat tumbler from Reveo. Just like the extremely expensive Gastrovac, this little machine can be used for vacuum impregnation of meat and other foods (or at least this is something I assume from the description). IMHO vacuum impregnation is the most important feature of the Gastrovac – far more important than the heating capabilities. Perhaps someone owning a Reveo could report back?

kitchengadget_vacuummeattumbler.jpg
For the Home: Meat, Your Maker. This vacuum tumbler cuts marinating time by hours, first extracting air to expand the meat’s fibers and then spinning it so that every area is exposed to your sauce of choice. Probably doesn’t beat a good long soak, but perfect for when barbecue inspiration suddenly strikes.—Abby Seiff

But I was very dissapointed that my all-time favorite kitchen gadget didn’t make it into the gallery: a simple thermometer. As I have stated in one of my tips for practical molecular gastronomy, this is probably the single tool that can improve your cooking the most.

Perfect steak with DIY “sous vide” cooking

Sunday, January 21st, 2007

One important aspect of molecular gastronomy is the application of scientific principles to food preparation in a normal kitchen. This can very well be illustrated by discussing the preparation of a steak. The surface of the meat needs to be heated to > 120 °C (250 F) for the Maillard reaction to take place at a reasonable rate. This gives meat much of it’s characteristic aroma. The interior of the meat however should not be heated to more than 50-65 °C (120-150 F) for a rare or a medium rare appearance. If the heat is provided by a frying pan with a temperature typically in the range 120-160 °C (250-320 F), the different temperature required for the interior and the surface of the meat can actually be quite difficult to achieve. Bringing the meat to room temperature before cooking by taking it out of the fridge 1-2 hours in advance helps. Also, half way through the cooking it’s advisable to let the meat rest on a plate to allow the heat to diffuse into the interior and to let the surface cool down a little.

There is however an easier way to make a perfect steak! In restaurants the method has been around since the 70′s and is known under the name sous vide (fr. under vacuum, more info on history of sous vide in this NY Times article). The meat is packed in plastic bags, vacuumed and put into thermostated water baths. This equipment is not (yet?) found in the average kitchen. So here is a simple DIY procedure. You just use a normal plastic bag, leave the meat in the water bath for 30 min (or longer) and then quickly fry both sides to generate the products of the Maillard reaction. You do need a thermometer though to control the temperature of the water bath, preferably one with a dip in probe.

1. Put the meat (I used a rib eye steak for this experiment) in a thick plastic bag. Only put one or two pieces of meat in each plastic bag – this ensures a greater contact surface with the water.

meat in plastic bag

2. Add any spices you like (salt and pepper always works well – for the experiment shown I used curry paste, soy sauce and chili sauce in stead), press (or suck) out the air and close the plastic bag tightly by tying a knot (or use a zip-lock bag). You don’t want any water to enter the bag!

meat in plastic bag

3. Heat a pot of water to the desired temperature (or use hot tap water) and place the plastic bag with meat in the water. Cover with a lid (not shown in the picture) to reduce heat loss. If you use a large pot of water it’s easier to keep the temperature constant. Also, it’s easier to control the temperature with an induction or gas stove top than with an electric plate since there is no additional heating once you turn them off. Regarding the temperature, start with 60 °C (140 F) and experiment from there (or check this table at Wikipedia for doneness temperatures of meat). You should leave the meat in the water for at least 30 minutes – more for a thicker cut. But the good thing is you can leave it for much longer (several hours) provided the temperature does not come above 60 °C (or whatever temperature you decided on). A convenient way to keep the temperature constant for a long time is to put the pan with water into the oven and use the thermostat of the oven.

meat in plasticbag, water at 59 C

4. Heat a frying pan, add a fat of you choice, remove meat from plastic bag and brown both sides of the meat. Since you take the meat directly from the water bath it’s already at about 60 °C. Therefore the browning is very fast.

meat-in-frying-pan

5. A temperature of 60 °C (140 F) gives the meat a pink interior. It’s succulent and juicy. The short frying gives it a nice browned crust and the chewing resistance is perfect. All in all a wonderful combination of taste, aroma, texture and mouth feel!

meat-interior

Note added January 2009:
Since I published this procedure the first time I’ve learnt a lot more about sous vide. The procedure above is a rather crude procedure, but it works. If the meat turns out grey you’ll need to turn the temperature somewhat down. If you’re interested in reading more about sous vide, the best discussion I know of which also includes important safety aspects is Douglas Baldwin’s “A Practical Guide to Sous Vide Cooking”.

Related posts:
A mathematician cooks sous vide
Sous vide cooking joy
Santa came early this year
Upcoming books on sous vide