One important aspect of molecular gastronomy is the application of scientific principles to food preparation in a normal kitchen. This can very well be illustrated by discussing the preparation of a steak. The surface of the meat needs to be heated to > 120 °C (250 F) for the Maillard reaction to take place at a reasonable rate. This gives meat much of it’s characteristic aroma. The interior of the meat however should not be heated to more than 50-65 °C (120-150 F) for a rare or a medium rare appearance. If the heat is provided by a frying pan with a temperature typically in the range 120-160 °C (250-320 F), the different temperature required for the interior and the surface of the meat can actually be quite difficult to achieve. Bringing the meat to room temperature before cooking by taking it out of the fridge 1-2 hours in advance helps. Also, half way through the cooking it’s advisable to let the meat rest on a plate to allow the heat to diffuse into the interior and to let the surface cool down a little.
There is however an easier way to make a perfect steak! In restaurants the method has been around since the 70’s and is known under the name sous vide (fr. under vacuum, more info on history of sous vide in this NY Times article). The meat is packed in plastic bags, vacuumed and put into thermostated water baths. This equipment is not (yet?) found in the average kitchen. So here is a simple DIY procedure. You just use a normal plastic bag, leave the meat in the water bath for 30 min (or longer) and then quickly fry both sides to generate the products of the Maillard reaction. You do need a thermometer though to control the temperature of the water bath, preferably one with a dip in probe.
1. Put the meat (I used a rib eye steak for this experiment) in a thick plastic bag. Only put one or two pieces of meat in each plastic bag – this ensures a greater contact surface with the water.
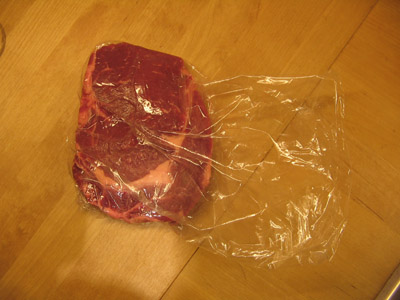
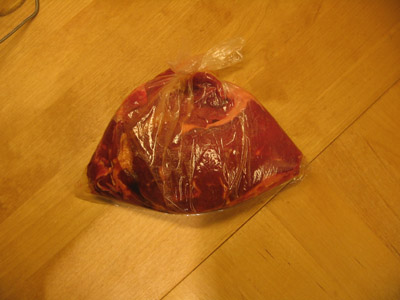
2. Add any spices you like (salt and pepper always works well – for the experiment shown I used curry paste, soy sauce and chili sauce in stead), press (or suck) out the air and close the plastic bag tightly by tying a knot (or use a zip-lock bag). You don’t want any water to enter the bag!
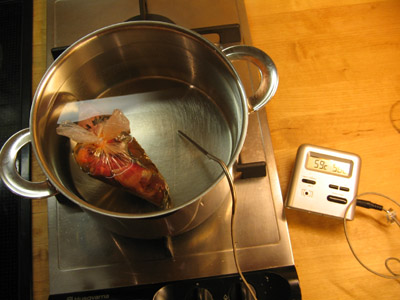
3. Heat a pot of water to the desired temperature (or use hot tap water) and place the plastic bag with meat in the water. Cover with a lid (not shown in the picture) to reduce heat loss. If you use a large pot of water it’s easier to keep the temperature constant. Also, it’s easier to control the temperature with an induction or gas stove top than with an electric plate since there is no additional heating once you turn them off. Regarding the temperature, start with 60 °C (140 F) and experiment from there (or check this table at Wikipedia for doneness temperatures of meat). You should leave the meat in the water for at least 30 minutes – more for a thicker cut. But the good thing is you can leave it for much longer (several hours) provided the temperature does not come above 60 °C (or whatever temperature you decided on). A convenient way to keep the temperature constant for a long time is to put the pan with water into the oven and use the thermostat of the oven.
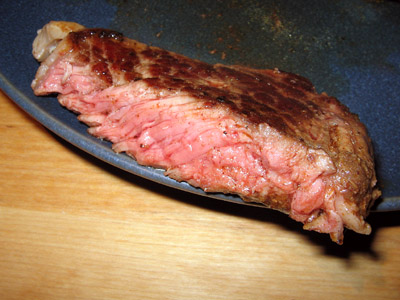
4. Heat a frying pan, add a fat of you choice, remove meat from plastic bag and brown both sides of the meat. Since you take the meat directly from the water bath it’s already at about 60 °C. Therefore the browning is very fast.
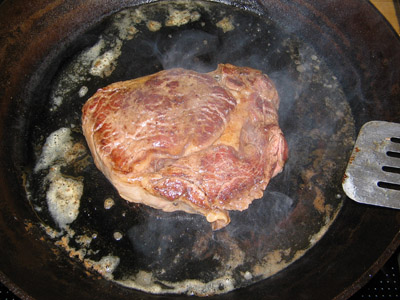
5. A temperature of 60 °C (140 F) gives the meat a pink interior. It’s succulent and juicy. The short frying gives it a nice browned crust and the chewing resistance is perfect. All in all a wonderful combination of taste, aroma, texture and mouth feel!
Note added January 2009:
Since I published this procedure the first time I’ve learnt a lot more about sous vide. The procedure above is a rather crude procedure, but it works. If the meat turns out grey you’ll need to turn the temperature somewhat down. If you’re interested in reading more about sous vide, the best discussion I know of which also includes important safety aspects is Douglas Baldwin’s “A Practical Guide to Sous Vide Cooking”.
Related posts:
A mathematician cooks sous vide
Sous vide cooking joy
Santa came early this year
Upcoming books on sous vide
I recently wrote about the same subject using SousVideMagic/Rice Cooker:
http://freshmealssolutions.com/index.php?option=com_myblog&show=How-To-Cook-Rice.html&Itemid=43
I just tried this with a lot of success using a pound of ordinary chuck eye ($3.50/lb.) I let the steaks warm to room temperature and gave them a rub consisting of olive oil, black pepper, dash of cumin, dash of salt, dash of garlic and then drop the steaks in a Reynolds’ crock pot liner (made of nylon resins and designed to be heated to this temperature for long periods of time.) I pushed as much air out as I could and then closed it off using only a twist tie.
For the water bath I used a stock pot about 60% full that I warmed to above the desired temperature (~75 C) and then cooled it down using cold tap water. Once I had it at the right temperature I adjusted my terrible electric range until it stayed constant at about 58 C. To measure the temperature I used an ordinary glass thermometer, as my probe thermometer died and I haven’t replaced it.
I placed the steak in the water and let it go for an hour, at the end of the hour I warmed up a regular old cast iron skillet on high until it was very hot and then immediately transferred the steaks and the juices that had collected in the bag. Closely watching the steaks at this point is key as they do brown very quickly, I was done in about 1.5 minutes.
Once browned I let the steaks rest on a cutting board for 10 minutes. The result was extremely tender and juicy, to the point that they could be cut using a fork. I can’t wait to try this again with a more expensive cut or something like london broil. If you let it go for 24 hours and then sliced it very thin I can’t imagine it being anything short of The Best Steak Ever.
Well…. I gave this method a try today using a lean ¾ inch 1 pound sirloin steak.
I sealed the steak in a bag – still frozen – using a cheap vacuum sealer. I left it to cook for approximately 5 hours. I attempted to maintain 60 degrees Celsius and never let it get more than 3-4 degrees above this temperature and only for a brief period of time. It was at 59 degrees for 99 percent of the time. I seared it after cooking in a frying pan for about a minute each side.
The steak appeared to be over done but when I was tasted it was more like well done. It was a consistent shade of grey throughout. I used no seasoning on it which was a mistake because it very bland tasting.
Next time I will marinate the steak in barbeque sauce before I cook it.
Although I was a little disappointed in the results I didn’t have high expectations for the cut of meat I was using in the first place.
Jimbo,
I used 59 C in this example and did get a pink interior, but this will depend on what meat you use and for how long you leave the meat in the bag. The results you describe suggest that you should try again at a lower temperature. Perhaps 55 C?
Although I’ve had tons of sous-vide meat at restaurants, I just had my first home sous-vide experience. It was delicious! This may become my new, standard method for preparing steak.
I use sous vide for ling cooked dishes. I recently prepared coq au vin using a roaster filled with water and brought to a constant temperature of 170 F. I wanted to have something good and hot after returning from a trip. It stayed in the bath for 15 hours as wella a bag of rice (cooked, then bagged). It came out great. Nothing dried outNow to find something bigger to make larger dishes
Martin,
I forgot I had commented here. Regarding my comment about a bag being water proof. Take a sandwich baggie and put in some water with dye (food coloring). Then put the bag into a bowl of clear water. After a few days, the water outside of the bag will be blue. That’s what happened in my 10th grade biology class, at least. I see, after reading lots of text on SV, that this is not really a concern … though I have never seen anyone specifically address it.
OK…
The idea of more tender temperature-controlled cooking came to me for custards and scallops, so I looked up water baths on the internet, eventually and accidentally coming upon ‘sous vide’. I’m a technical guy (a doc), so this kind of thinking is what I do. The internet is amazing, I guess almost nothing is original (I thought it was my idea, but obviously it ain’t). I’m interested in some of the myths about this though since they don’t make any sense to me.
1. Vacuum. It seems to me that the air needs to come out of the bag for one reason only, more bag contact with the meat so the heat transfer is unimpeded (water->bag->meat). Well..also floatation; if there is air in the bag. There are so many entries about the “quality of the vacuum”. Once there is full contact with the meat, there is no more vacuum possible, so I don’t understand this fetish. I don’t understand what an “indiustrial” vaccuum will do. It makes no sense that this will keep juice in the meat. As the structure shrinks, the juice will come out (the better to make your sauce at the end anyway). These entries only seem like a way to sell something.
1a. You don’t need ANY vacuum device, you just need to take a zip lock bag with your meal in it, close the zip about 90% of the way and then holding the top immerse it in the water bath making sure no water gets in (If your fingers are sensitive, you can do this in cold water too). The bag will compress under water pressure and just when it is immersed all the way to the top, then close the last 10% of the Ziplock. Total cost of equipment=Ziplock bag. The only time this doesn’t work is if you have something like broccoli which has a bizarre shape and only a strong vacuum will increase bag contact.
2. The name ‘sous vide’ in french is “under vacuum”. I don’t think the vacuum has ANYTHING to do with it other than allowing heat transfer. I think the whole process is merely very stringent heat control. Am I wrong…I don’t think so?
3. If you use a very heavy pot, a very large pot, and have a kettle on one side with very hot water in it and cold water (or ice cubes) handy on the other, you don’t need any special equipment either for heat control (Unless you want it go go all day while you’re at work). The temperature changes are VERY slow in this situation (due to the large volume of water and the cast iron), and over time you can mark the levels on your stove which correspond to particular water temperatures. I carry around one of those ‘remote’ thermometers which are very accurate and alarm when the water temperature exceeds a certain level.
4. To get to temperature, put the large water bath on the heat (hot water from the tap gets you there faster), and put it on HIGH. When it reaches temperature, your remote thermometer will alarm. Just take the pot off the heat, and the temperature will stay at that level for quite a while (the more water, the longer it will stay). I then put it on ANOTHER burner set where I know the heat will remain where I want it so the residual heat from the first “high” burner won’t continue heating the water…unfortunately (very unfortunately) I have an electrical stove, but I’ve learned to live with it.
Is there anything wrong with any of this thinking? Help.
we use this method at work for our tenderloins but i want to know if i can use SV for cooking flank steak.
Nico:
1. You are right about the heat transfer and floatation. I can’t think of any good reason why there should be a large difference between a good vacuum and a _very_ good vacuum.
2. I guess the name is used for historic reasons…
3/4. I always use large pots with water if I do sous-vide, but of course it all depends on how accurate you need/want to control the temperature. If you’re after differences of 1/10’s of degrees you’d better go with a thermostat with circulating water. For home use however the “manual” method works just fine.
[…] results that other cooking methods simply cannot — in flavor and precision. For example, steak that is a perfect medium rare from top to bottom; and meltingly tender yet medium rare short ribs that haven’t lost their flavor to the sauce. […]
Sous vide: so named because the original application was for vacuum sealing and long term storage of food. Food can go from being cooked to freezer to being cooked again without losing moisture or flavor. If you don’t vacuum seal, you are just poaching in a bag. Vacuum sealing also means better heat transfer and no floating bags. Of course, you can still have a tasty steak without vacuum sealing. It’s just not really sous vide.
Types of meat: fat=flavor, so if you use a very lean cut with no additional seasonings, you will get flavorless meat, regardless of cooking technique. Searing will add a little flavor through caramelization but the center will still be bland. Use a well marbled cut and the fat will melt into the meat very slowly and at a temperature that it won’t just drip out, as it does in grilling. Wagyu would be a perfect type of beef for sous vide because the fats are very sensitive to heat and will cook out too quickly under normal grilling conditions.
Cooking time and temp: if the meat is turning grey, the temp is too high. Since the water temp is constant, the meat can’t get hotter than the water, so it will stay medium-rare if you use medium rare cooking temp. The length of cooking will mean more collagen breakdown, which will mean a more tender steak.
Safety: toxic pathogens are only a concern if you attempt long-term cooking or if you cook at very low temps (such as the 105-115F best for some fish) and then attempt to store the meat. Here’s some guidelines form Nathan Myhrvold: in a water bath at 55C (131F), meat will be sterilized in 112 minutes. The 160F guidelines used by governmental agencies does not really apply to sous vide because of this. A 45mm steak will be done to medium rare in 125 minutes. Of course, some toxic pathogens thrive in anaerobic, warm conditions, but require more time to flourish.
Toxicity of plastic: I’m pretty sure I will die from the consumption of red meat before I die from exposure to toxins in overheated plastic bags during sous vide cooking. Just how much sous vide are you planning on doing?
[…] site you can watch it at a better resolution). I’ve covered the topic before in my post on DIY sous-vide, but their video is much more entertaining They use a vacuum cleaner to suck out the air and a […]
I tried this method yesterday with great results. I’m a sous chef in a fine dining restaurant. We set up a water bath in one of our biggest stove top pots. I filled with water to 1 inch to the top and used a candy thermometer and managed to maintain it at 140F for a couple hours. I vacuum sealed a 10oz striploin steak, lightly seasoned with our house seasoning salt, in my Foodsaver sealer. I sous vide cooked it for 30 minutes at that temp, removed it from the bag and seared it on both sides until just lightly caramelized. It was a perfect med rare, very moist, very tender.
Myself, the cooks and the waiters who tried it were all impressed by the results. They were all curious about the cooking method and surprised by the finally product. I would say that the end product was far superior to a steak cooked on a broiler.
Try this method out! Use a large pot of water to help maintain the temp. It’s easy and you’ll be pleased by the results.
[…] nor do I own an immersion circulator. But I have been reading Khymos’ blog for a while and he explained his way to do it (with a steak in that case) and it seemed easy enough. To re-enforce my feeling that it was […]
You know, in addition to browning the steaks by pan frying, you can also brown them with a blowtorch. Lots of fun and much easier to control the level of browning.
There’s a bunch of sous vide cooking tips and recipes available on our sous vide cooking site: http://www.sousvidesimple.com. Check it out.
[…] But browsing around the webs, I found there are more than a few botulism-flirts who have developed at-home ways to sous-vide your own food. My favorite is Grub Hacker, who made his own sous vide machine using a […]
This is so that the Maillard reaction is created as quickly as possible without cooking the interior of the meat. At home I would probably use a smoking-hot grill pan with no fat. As you say Erik a burner would do as well,
🙂
[…] garantert feil). Så sant ovnen ikke varierer for mye får en da perfekt temperatur og resultat. En komplett beskrivelse av dette har jeg i ettertid funnet hos Khymos, men du kan også velge å se filmen under: Please enable Javascript and Flash to view this Blip.tv […]
The warm setting on my el cheapo crockpot is 141 F as measured by an electronic thermometer.
Ribs:
Boiled a couple of minutes
Dropped in crockpot on warm for 24 hours with bbq sauce
They are drop-dead good! Falling apart and wonderful.
(Note – the bbq sauce I use to cook them in was a home-made one and the finishing/serving sauce was a famous commercial one.)
Yum – I am going to do this again!!!
[…] oil for the fish. Now, I don’t have a immersion circulator or a vacuum sealer but after reading this post I decided I was going to try to cook my fish sous vide (wrapped in plastic in hot water) as […]
You’re going to laugh. I did everything wrong. I went out and bought a little piece of tenderloin, about 3/8 of a pound and something like 1-1/4 inch thick. I brought it home and started to let it sit out to get to room temperature, then thought about my baby crock pot (1-1/2 quart oval). Put the little steak, still half cold, in a generic Ziploc bag without any seasonings and sucked out the air, probably not doing a terrific job. Filled my crock pot with a quart of the hottest I could get my tap water, then floated (yes!) the little package in it, cover on, on Keep Warm for 20 minutes. Then I went and felt the water and it was not even as warm as when I started. Turned it up to High and let it sit for 40 more minutes. When I came back, i was afraid I had overcooked it because it was kind of medium brown all over, but it “felt” medium-rare and had exuded just a spoonful of juice. I took a cheap Teflon pan (no, I let my ex-boyfriend steal my cast iron skillet) and heated it up on almost-high with a spoonful of olive oil. Salted and peppered the steak, seared it good on both sides, and thought to myself, “Is that really all there is to this?” Plate, veggie, garnish, stare at it for two or three minutes wondering if I **ed it up. Put a dribble of black cherry balsamic vinegar on top, and sliced into it, and…. um, WOW. Just WOW.
Thanks so much for this technique. I’m going to practice once more on a different meat, to get a feel for it, and then I’ll probably use this for a fancy boss-dinner party in early December. Lifesaving.
Can some of you post a link where I can buy special bags for cooking sous vide?
I have some for my vacuum packer, but I don’t know if I can cook with them.
Cheers
C.
Paula Wolfert published a recipe in Nov 2009 Food and Wine on Cassoulet. She instructs making the duck confit sous vide style. Well, it came out perfect. I deep frind the the legs for about three minutes. Perfect texture and crispy skin.
Also, William Sonoma nows sells a $500 sous vide circulator. I am told it will come down to as low as $200 within two years as more fabricators get into the business